Introduction
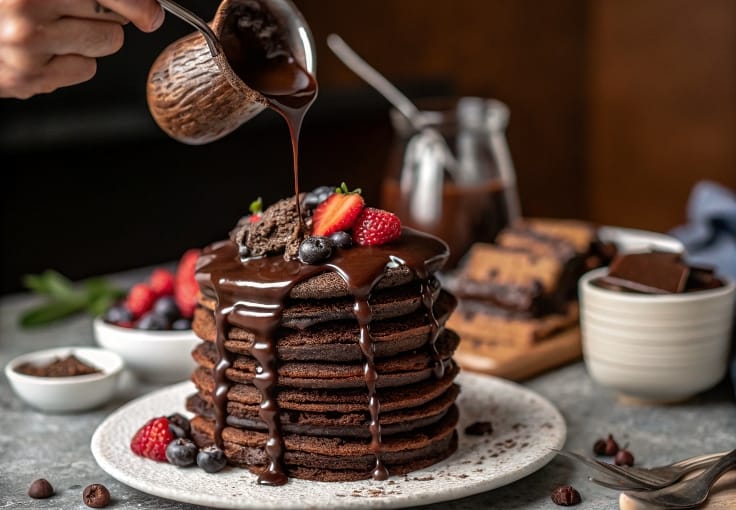
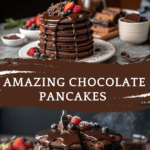
These chocolate pancakes are not your average breakfast—they’re dessert for breakfast, made acceptable. Soft, rich, and irresistibly chocolatey, these pancakes are layered with both cocoa powder and melted bittersweet chocolate, then taken to the next level with chocolate chips for melty bursts in every bite. Topped with whipped cream, berries, or a drizzle of ganache? Absolute heaven.
Perfect for weekend brunches, birthday breakfasts, or any time you need to spoil yourself or someone special, this recipe is the ultimate chocolate lover’s dream. The texture is light and fluffy thanks to a balanced leavening blend, and the deep cocoa flavor is intensified by a splash of vanilla and real chocolate in the batter.
Explore more indulgent breakfasts and sweet treats at recipeservice.net, your go-to for comfort food recipes done right.
🛒 Ingredients
🥚 Refrigerated
- 2 large eggs
🧁 Baking & Spices
- 1⅓ cups all-purpose flour
- 2 teaspoons baking powder
- ¼ cup cocoa powder (unsweetened)
- ⅓ cup granulated sugar
- ¼ teaspoon salt
- 1 teaspoon pure vanilla extract
- 140g bittersweet or semisweet chocolate (melted)
- ½ cup (85g) chocolate chips or chunks
🧈 Oils & Vinegars
- Butter or oil (for greasing the pan)
- 3 tablespoons canola or vegetable oil
🥛 Dairy
- ½ cup heavy cream
- 1 cup whole milk

👨🍳 Directions
🔥 Step 1: Melt the Chocolate
- In a heatproof bowl, melt 140g bittersweet or semisweet chocolate in the microwave or over a double boiler.
- Stir until smooth and set aside to cool slightly.
🥣 Step 2: Mix the Dry Ingredients
In a large bowl, whisk together:
- 1⅓ cups all-purpose flour
- ¼ cup cocoa powder
- 2 tsp baking powder
- ⅓ cup granulated sugar
- ¼ tsp salt
🥛 Step 3: Mix the Wet Ingredients
In a separate bowl, whisk together:
- 2 eggs
- 1 cup whole milk
- ½ cup heavy cream
- 3 tbsp vegetable oil
- 1 tsp vanilla extract
Then, slowly whisk in the melted chocolate until well combined.
🍫 Step 4: Combine Wet and Dry
- Pour the wet mixture into the dry ingredients.
- Stir until just combined—don’t overmix! The batter should be thick and slightly lumpy.
- Gently fold in ½ cup chocolate chips or chunks.
🧈 Step 5: Cook the Pancakes
- Heat a large nonstick skillet or griddle over medium heat. Lightly grease with butter or oil.
- Pour about ¼ cup batter per pancake onto the skillet.
- Cook for 2–3 minutes, until bubbles form on the surface. Flip and cook another 1–2 minutes until cooked through.
- Transfer to a plate and repeat with remaining batter.
🍫 Optional Toppings
- Chocolate ganache or syrup
- Fresh berries
- Whipped cream
- Crushed nuts
- Powdered sugar dusting
- Vanilla or chocolate ice cream (for dessert-style serving!)
🍽️ Servings and Timing
- Servings: 8–10 pancakes (4 servings)
- Prep Time: 10 minutes
- Cook Time: 15–20 minutes
- Total Time: 30 minutes
🍴 Serving Ideas
- Stack ‘em high: Layer with cream or syrup between pancakes.
- Choco-Berry Stack: Add strawberries or raspberries between layers for contrast.
- Mini Pancake Skewers: Use a round cutter to make mini pancakes and thread onto skewers with fruit.
🧑🍳 Variations
- Double Chocolate Mocha: Add 1 tsp espresso powder to the batter.
- Nutella-Stuffed: Add a small spoonful of Nutella between two layers of batter before flipping.
- Gluten-Free: Use a 1:1 gluten-free flour blend.
- Vegan Option: Replace eggs with flax eggs, cream with coconut cream, and milk with almond milk. Use dairy-free chocolate.
🧊 Storage & Reheating
Refrigerator:
- Store in an airtight container for up to 3 days.
Freezer:
- Freeze pancakes individually wrapped for up to 2 months. Reheat in toaster or oven.
Reheating:
- Toast or microwave for 30–45 seconds until warm.
- Reheat in oven at 300°F (150°C) for 5–6 minutes.
❓ 10 Frequently Asked Questions (FAQs)
1. Can I make the batter ahead of time?
Yes, store it covered in the fridge for up to 24 hours. Stir before using.
2. Why are my pancakes dense?
Avoid overmixing the batter. Just mix until dry ingredients are moistened.
3. Can I use dark chocolate?
Absolutely! Use at least 60–70% cacao for a rich taste.
4. Can I make them without chocolate chips?
Yes. The melted chocolate in the batter provides enough flavor.
5. How do I keep pancakes warm for a crowd?
Place in a 200°F oven on a baking sheet while cooking the rest.
6. What cocoa powder should I use?
Unsweetened natural cocoa powder works best for balance.
7. Can I make these in a waffle iron?
Yes! Just grease well and cook according to your waffle iron’s instructions.
8. Can I use buttermilk instead of milk and cream?
Yes, substitute 1½ cups buttermilk for both.
9. How do I make a ganache drizzle?
Melt ½ cup chocolate chips with ¼ cup cream until smooth. Drizzle over warm pancakes.
10. Are these pancakes overly sweet?
No—they’re rich but balanced. You can reduce the sugar slightly if preferred.
📝 Conclusion
The Most Amazing Chocolate Pancakes live up to their name. Rich, fluffy, and studded with melty chocolate, they blur the line between breakfast and dessert in the most delicious way possible. Whether you’re making them for Valentine’s Day, a birthday breakfast, or just because you want a little chocolate therapy, these pancakes deliver maximum joy in every bite.
Looking for more chocolate-forward breakfast ideas? Explore our full recipe archive at recipeservice.net for even more decadent starts to your day.
The Most Amazing Chocolate Pancakes – Rich, Fluffy, and Decadently Delicious
These chocolate pancakes are not your average breakfast—they’re dessert for breakfast, made acceptable. Soft, rich, and irresistibly chocolatey, these pancakes are layered with both cocoa powder and melted bittersweet chocolate, then taken to the next level with chocolate chips for melty bursts in every bite. Topped with whipped cream, berries, or a drizzle of ganache? Absolute heaven. Perfect for weekend brunches, birthday breakfasts, or any time you need to spoil yourself or someone special, this recipe is the ultimate chocolate lover’s dream. The texture is light and fluffy thanks to a balanced leavening blend, and the deep cocoa flavor is intensified by a splash of vanilla and real chocolate in the batter. Explore more indulgent breakfasts and sweet treats at recipeservice.net, your go-to for comfort food recipes done right
🥚 Refrigerated
- 2 large eggs
🧁 Baking & Spices
- 1⅓ cups all-purpose flour
- 2 teaspoons baking powder
- ¼ cup cocoa powder (unsweetened)
- ⅓ cup granulated sugar
- ¼ teaspoon salt
- 1 teaspoon pure vanilla extract
- 140 g bittersweet or semisweet chocolate (melted)
- ½ cup 85g chocolate chips or chunks
🧈 Oils & Vinegars
- Butter or oil (for greasing the pan)
- 3 tablespoons canola or vegetable oil
🥛 Dairy
- ½ cup heavy cream
- 1 cup whole milk
🔥 Step 1: Melt the Chocolate
- In a heatproof bowl, melt 140g bittersweet or semisweet chocolate in the microwave or over a double boiler.
- Stir until smooth and set aside to cool slightly.
🥣 Step 2: Mix the Dry Ingredients
- In a large bowl, whisk together:
- 1⅓ cups all-purpose flour
- ¼ cup cocoa powder
- 2 tsp baking powder
- ⅓ cup granulated sugar
- ¼ tsp salt
🥛 Step 3: Mix the Wet Ingredients
- In a separate bowl, whisk together:
- 2 eggs
- 1 cup whole milk
- ½ cup heavy cream
- 3 tbsp vegetable oil
- 1 tsp vanilla extract
- Then, slowly whisk in the melted chocolate until well combined.
🍫 Step 4: Combine Wet and Dry
- Pour the wet mixture into the dry ingredients.
- Stir until just combined—don’t overmix! The batter should be thick and slightly lumpy.
- Gently fold in ½ cup chocolate chips or chunks.
🧈 Step 5: Cook the Pancakes
- Heat a large nonstick skillet or griddle over medium heat. Lightly grease with butter or oil.
- Pour about ¼ cup batter per pancake onto the skillet.
- Cook for 2–3 minutes, until bubbles form on the surface. Flip and cook another 1–2 minutes until cooked through.
- Transfer to a plate and repeat with remaining batter.
🍫 Optional Toppings
- Chocolate ganache or syrup
- Fresh berries
- Whipped cream
- Crushed nuts
- Powdered sugar dusting
- Vanilla or chocolate ice cream (for dessert-style serving!)
🍴 Serving Ideas
Stack ‘em high: Layer with cream or syrup between pancakes.
Choco-Berry Stack: Add strawberries or raspberries between layers for contrast.
Mini Pancake Skewers: Use a round cutter to make mini pancakes and thread onto skewers with fruit.
🧑🍳 Variations
Double Chocolate Mocha: Add 1 tsp espresso powder to the batter.
Nutella-Stuffed: Add a small spoonful of Nutella between two layers of batter before flipping.
Gluten-Free: Use a 1:1 gluten-free flour blend.
Vegan Option: Replace eggs with flax eggs, cream with coconut cream, and milk with almond milk. Use dairy-free chocolate.
🧊 Storage & Reheating
Refrigerator:
Store in an airtight container for up to 3 days.
Freezer:
Freeze pancakes individually wrapped for up to 2 months. Reheat in toaster or oven.
Reheating:
Toast or microwave for 30–45 seconds until warm.
Reheat in oven at 300°F (150°C) for 5–6 minutes.
❓ 10 Frequently Asked Questions (FAQs)
1. Can I make the batter ahead of time?
Yes, store it covered in the fridge for up to 24 hours. Stir before using.
2. Why are my pancakes dense?
Avoid overmixing the batter. Just mix until dry ingredients are moistened.
3. Can I use dark chocolate?
Absolutely! Use at least 60–70% cacao for a rich taste.
4. Can I make them without chocolate chips?
Yes. The melted chocolate in the batter provides enough flavor.
5. How do I keep pancakes warm for a crowd?
Place in a 200°F oven on a baking sheet while cooking the rest.
6. What cocoa powder should I use?
Unsweetened natural cocoa powder works best for balance.
7. Can I make these in a waffle iron?
Yes! Just grease well and cook according to your waffle iron’s instructions.
8. Can I use buttermilk instead of milk and cream?
Yes, substitute 1½ cups buttermilk for both.
9. How do I make a ganache drizzle?
Melt ½ cup chocolate chips with ¼ cup cream until smooth. Drizzle over warm pancakes.
10. Are these pancakes overly sweet?
No—they’re rich but balanced. You can reduce the sugar slightly if preferred.
📝 Conclusion
The Most Amazing Chocolate Pancakes live up to their name. Rich, fluffy, and studded with melty chocolate, they blur the line between breakfast and dessert in the most delicious way possible. Whether you’re making them for Valentine’s Day, a birthday breakfast, or just because you want a little chocolate therapy, these pancakes deliver maximum joy in every bite.
Looking for more chocolate-forward breakfast ideas? Explore our full recipe archive at recipeservice.net for even more decadent starts to your day.