If you’re craving a satisfying dinner that feels indulgent but fits your low-carb lifestyle, these Spinach Stuffed Chicken Breasts are the answer. Juicy chicken breasts are filled with a creamy spinach and cheese mixture, then baked to golden, melty perfection. It’s keto-friendly, gluten-free, and packed with protein — ideal for busy weeknights, meal prep, or even impressing dinner guests with something secretly simple.
🍽️ Servings & Time
Yield: 4 servings
Prep Time: 10 minutes
Cook Time: 25 minutes
Total Time: 35 minutes
🛒 Ingredients
For the Chicken:
4 boneless, skinless chicken breasts
1 tbsp olive oil
1 tsp smoked paprika
Salt & pepper, to taste
Toothpicks or cooking twine
For the Filling:
1 ½ cups fresh spinach (roughly chopped)
½ cup cream cheese, softened
½ cup shredded mozzarella cheese
¼ cup grated Parmesan
2 garlic cloves, minced
½ tsp onion powder
Optional: red pepper flakes for heat
🧑🍳 Equipment Needed
Sharp knife
Skillet or baking dish
Mixing bowl
Spoon or spatula
Toothpicks or twine
Oven-safe thermometer (optional)
🍳 Instructions
1. Prepare the Chicken:
Preheat oven to 375°F (190°C). Using a sharp knife, slice a pocket horizontally into each chicken breast (do not cut all the way through). Season the outside with salt, pepper, and smoked paprika.
2. Make the Filling:
In a bowl, combine spinach, cream cheese, mozzarella, Parmesan, garlic, onion powder, and optional chili flakes. Mix until smooth and creamy.
3. Stuff the Chicken:
Spoon the filling evenly into each chicken pocket. Use toothpicks or twine to secure the openings.
4. Sear and Bake:
Heat olive oil in an oven-safe skillet over medium-high heat. Sear the chicken on both sides until golden (about 2–3 minutes per side). Transfer to the oven and bake for 15–18 minutes, or until internal temp reaches 165°F (74°C).
5. Rest & Serve:
Remove toothpicks, let rest for 5 minutes, then slice and serve with a drizzle of pan juices.
🔁 Variations
Add Sun-Dried Tomatoes to the filling for a Mediterranean twist
Use Kale or Arugula instead of spinach
Add Bacon Crumbles for extra flavor and texture
🧊 Storage Tips
Fridge: Store in an airtight container for 3–4 days
Reheat: Gently reheat in a covered skillet or in the oven at 300°F
Freeze: Wrap uncooked stuffed breasts in foil and freeze for up to 2 months
❓ Frequently Asked Questions
Can I use frozen spinach? Yes — just thaw, drain, and squeeze out excess water before mixing.
Is it good for meal prep? Absolutely! Just prep and bake ahead. It reheats well and pairs with any veggie or salad.
What can I serve with it? Cauliflower mash, roasted broccoli, or a fresh arugula salad are perfect low-carb sides.
If you’re craving a satisfying dinner that feels indulgent but fits your low-carb lifestyle, these Spinach Stuffed Chicken Breasts are the answer. Juicy chicken breasts are filled with a creamy spinach and cheese mixture, then baked to golden, melty perfection. It’s keto-friendly, gluten-free, and packed with protein — ideal for busy weeknights, meal prep, or even impressing dinner guests with something secretly simple.
Sharp knife
Skillet or baking dish
Mixing bowl
Spoon or spatula
Toothpicks or twine
Oven-safe thermometer (optional)
For the Chicken:
4 boneless (skinless chicken breasts)
1 tbsp olive oil
1 tsp smoked paprika
Salt & pepper (to taste)
Toothpicks or cooking twine
For the Filling:
1 ½ cups fresh spinach (roughly chopped)
½ cup cream cheese (softened)
½ cup shredded mozzarella cheese
¼ cup grated Parmesan
2 garlic cloves (minced)
½ tsp onion powder
Optional: red pepper flakes for heat
Prepare the Chicken:
Preheat oven to 375°F (190°C). Using a sharp knife, slice a pocket horizontally into each chicken breast (do not cut all the way through). Season the outside with salt, pepper, and smoked paprika.
Make the Filling:
In a bowl, combine spinach, cream cheese, mozzarella, Parmesan, garlic, onion powder, and optional chili flakes. Mix until smooth and creamy.
Stuff the Chicken:
Spoon the filling evenly into each chicken pocket. Use toothpicks or twine to secure the openings.
Sear and Bake:
Heat olive oil in an oven-safe skillet over medium-high heat. Sear the chicken on both sides until golden (about 2–3 minutes per side). Transfer to the oven and bake for 15–18 minutes, or until internal temp reaches 165°F (74°C).
Rest & Serve:
Remove toothpicks, let rest for 5 minutes, then slice and serve with a drizzle of pan juices.
🔁 Variations
Add Sun-Dried Tomatoes to the filling for a Mediterranean twist
Use Kale or Arugula instead of spinach
Add Bacon Crumbles for extra flavor and texture
🧊 Storage Tips
Fridge: Store in an airtight container for 3–4 days
Reheat: Gently reheat in a covered skillet or in the oven at 300°F
Freeze: Wrap uncooked stuffed breasts in foil and freeze for up to 2 months
❓ Frequently Asked Questions
Can I use frozen spinach?
Yes — just thaw, drain, and squeeze out excess water before mixing.
Is it good for meal prep?
Absolutely! Just prep and bake ahead. It reheats well and pairs with any veggie or salad.
What can I serve with it?
Cauliflower mash, roasted broccoli, or a fresh arugula salad are perfect low-carb sides.
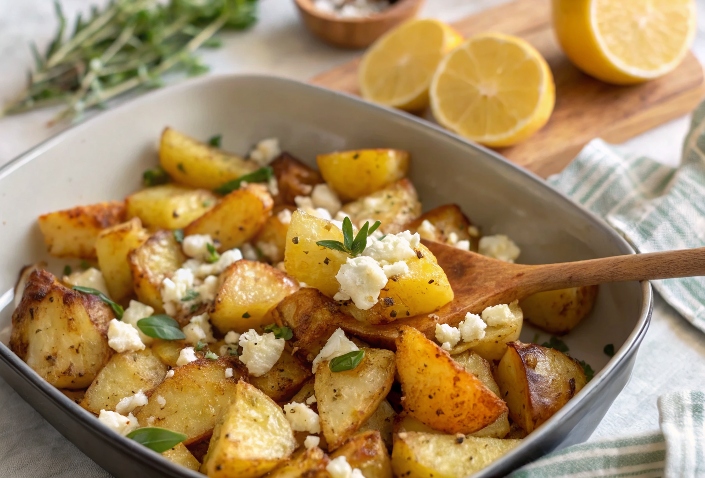
If you’re looking for the ultimate side dish (or cozy vegetarian main) that’s effortless yet packed with bold, savory flavor, this Baked Feta Potatoes recipe is calling your name. It’s the kind of dish you’ll make once and immediately add to your regular rotation.
Roasted golden yellow potatoes, creamy feta cheese, rich roasted garlic, and a splash of fresh lemon juice, all tied together with a medley of Greek-inspired herbs — this dish is the definition of simple ingredients, big flavor. Think of it like a warm potato salad meets whipped feta dip meets Greek street food — all roasted in one pan.
Whether you’re vegetarian or just craving a hearty meatless dish, this bake makes the perfect addition to any dinner table. Serve it as a side for grilled proteins, or let it shine on its own with a big green salad and some crusty bread.
Here’s everything you’ll need to make this dish sing:
Produce:
2 lbs yellow potatoes, washed and quartered
1 whole head of garlic, top sliced off
1 lemon, zest and juice
Cheese:
7–8 oz block of feta cheese, crumbled or whole
Oil:
3–4 tbsp olive oil
Herbs & Seasonings:
1 tsp dried oregano
½ tsp dried thyme
Salt and black pepper, to taste
Optional: red chili flakes or paprika for a spicy kick
🥔 No need to peel the potatoes unless preferred — the skins crisp beautifully in the oven!
🧀 Make sure your feta is vegetarian if needed, as not all feta is rennet-free.
👨🍳 Instructions
Step 1: Prep the Oven and Potatoes
Preheat your oven to 400°F (200°C).
In a large bowl, toss quartered potatoes with:
2–3 tbsp olive oil
Salt and pepper
Oregano and thyme
Transfer to a roasting dish or baking pan, spreading evenly.
Step 2: Add Garlic and Feta
Nestle the whole head of garlic (with the top cut off) into the center of the dish.
Place the block of feta or crumbled feta on top or to the side of the potatoes.
Drizzle everything with another tablespoon of olive oil.
🧄 The garlic will roast and become sweet, soft, and mashable — perfect for mixing into the sauce later.
Step 3: Roast
Roast in the oven for 35–40 minutes, or until:
Potatoes are golden and crispy on the edges
Feta is softened and browned
Garlic is tender when poked with a fork
🔄 Toss the potatoes halfway through cooking for even browning.
Step 4: Mash and Mix
Carefully remove the dish from the oven.
Use tongs to squeeze the roasted garlic cloves out of their skins into the pan.
Use a fork or masher to mash the garlic with the melted feta and a little bit of the lemon juice, mixing it around the potatoes.
Step 5: Finish with Lemon
Zest the lemon over the top of the dish.
Squeeze in fresh lemon juice to brighten everything up.
Garnish with a pinch of chili flakes, fresh herbs, or a drizzle of olive oil, if desired.
⏱ Servings & Timing
Servings: 4 (as a side) or 2 (as a main)
Prep Time: 10 minutes
Cook Time: 40 minutes
Total Time: 50 minutes
🔁 Variations
1. Spicy Feta Potatoes
Add ½ tsp chili flakes or smoked paprika before roasting for a subtle kick.
2. Herb Explosion
Add fresh rosemary, thyme, or dill before roasting for extra aromatics.
3. Tomato Feta Fusion
Add cherry tomatoes to the baking dish for a burst of sweetness.
4. Feta Yogurt Sauce Finish
Mix roasted garlic and feta with Greek yogurt after baking for a creamy sauce drizzle.
5. Vegan Version
Use a vegan feta alternative and roasted garlic tahini dressing for a similar creamy, tangy flavor.
🧊 Storage & Reheating
Fridge:
Store leftovers in an airtight container for up to 4 days.
Reheat:
Reheat in the oven at 350°F for 10–15 minutes to restore crispiness.
Microwave works too (though less crisp).
Freezing:
Not recommended — feta changes texture and the potatoes can get mushy.
❓ 10 Frequently Asked Questions (FAQs)
1. What type of potatoes work best?
Yellow or gold potatoes (like Yukon Gold) offer the best balance of creaminess and crispiness.
2. Do I have to use a whole garlic head?
Not at all! You can use a few cloves or skip if you’re not a big garlic fan.
3. Can I use crumbled feta instead of a block?
Yes — just scatter it over the top of the potatoes and mix as directed.
4. Can I add protein to this dish?
Absolutely! Add chickpeas before roasting, or serve alongside grilled chicken, lamb, or tofu.
5. Is this dish gluten-free?
Yes — all ingredients are naturally gluten-free.
6. Can I prep this ahead of time?
You can cut the potatoes and pre-mix the seasoning, but it’s best roasted fresh.
7. How do I get the potatoes really crispy?
Spread them out in a single layer and don’t overcrowd the pan — and roast at high heat.
8. What can I serve this with?
Grilled meats
Greek salad
Roasted vegetables
Hummus and pita
9. Can I use other cheeses?
Yes — goat cheese or ricotta would also be delicious, though feta offers the best salt and tang.
10. Is it vegetarian-friendly?
It can be! Just make sure your feta is made with vegetarian rennet.
✅ Conclusion
These Baked Feta Potatoes are a weeknight win and a dinner party hero. Crispy, herby, creamy, and packed with Mediterranean flavor, they’re versatile, low-effort, and totally addictive. Whether you serve them as a side dish, main, or even warm salad — this recipe is all about flavor meets simplicity.
Pair them with a crisp white wine or sparkling lemonade and let the feta magic do the talking.
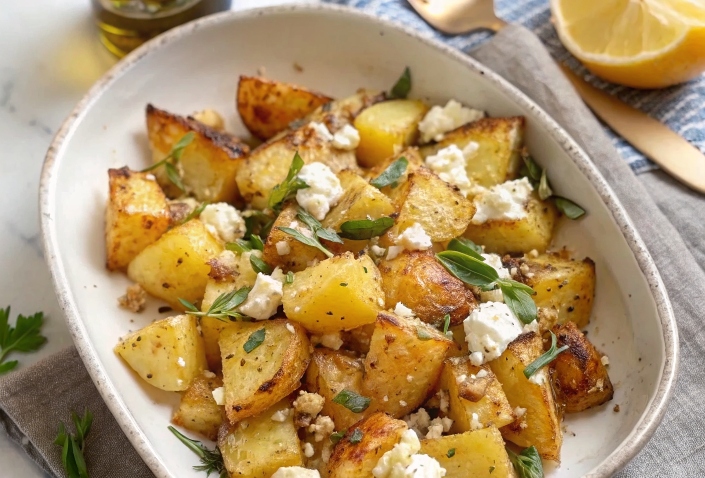
If you’re looking for the ultimate side dish (or cozy vegetarian main) that’s effortless yet packed with bold, savory flavor, this Baked Feta Potatoes recipe is calling your name. It’s the kind of dish you’ll make once and immediately add to your regular rotation.
Roasted golden yellow potatoes, creamy feta cheese, rich roasted garlic, and a splash of fresh lemon juice, all tied together with a medley of Greek-inspired herbs — this dish is the definition of simple ingredients, big flavor. Think of it like a warm potato salad meets whipped feta dip meets Greek street food — all roasted in one pan.
Whether you’re vegetarian or just craving a hearty meatless dish, this bake makes the perfect addition to any dinner table. Serve it as a side for grilled proteins, or let it shine on its own with a big green salad and some crusty bread.
Love easy Greek-inspired recipes? You might also enjoy Greek Lemon Potatoes or Baked Feta Pasta.
Large baking dish or roasting pan
Cutting board & sharp knife
Mixing bowl
Zester or grater
Fork or potato masher
Measuring spoons
Tongs or spatula
Produce:
2 lbs yellow potatoes (washed and quartered)
1 whole head of garlic (top sliced off)
1 lemon (zest and juice)
Cheese:
7 –8 oz block of feta cheese (crumbled or whole)
Oil:
3 –4 tbsp olive oil
Herbs & Seasonings:
1 tsp dried oregano
½ tsp dried thyme
Salt and black pepper (to taste)
Optional: red chili flakes or paprika for a spicy kick
🥔 No need to peel the potatoes unless preferred — the skins crisp beautifully in the oven!
🧀 Make sure your feta is vegetarian if needed, as not all feta is rennet-free.
Step 1: Prep the Oven and Potatoes
Preheat your oven to 400°F (200°C).
In a large bowl, toss quartered potatoes with:
2–3 tbsp olive oil
Salt and pepper
Oregano and thyme
Transfer to a roasting dish or baking pan, spreading evenly.
Step 2: Add Garlic and Feta
Nestle the whole head of garlic (with the top cut off) into the center of the dish.
Place the block of feta or crumbled feta on top or to the side of the potatoes.
Drizzle everything with another tablespoon of olive oil.
🧄 The garlic will roast and become sweet, soft, and mashable — perfect for mixing into the sauce later.
Step 3: Roast
Roast in the oven for 35–40 minutes, or until:
Potatoes are golden and crispy on the edges
Feta is softened and browned
Garlic is tender when poked with a fork
🔄 Toss the potatoes halfway through cooking for even browning.
Step 4: Mash and Mix
Carefully remove the dish from the oven.
Use tongs to squeeze the roasted garlic cloves out of their skins into the pan.
Use a fork or masher to mash the garlic with the melted feta and a little bit of the lemon juice, mixing it around the potatoes.
Step 5: Finish with Lemon
Zest the lemon over the top of the dish.
Squeeze in fresh lemon juice to brighten everything up.
Garnish with a pinch of chili flakes, fresh herbs, or a drizzle of olive oil, if desired.
🔁 Variations
1. Spicy Feta Potatoes
Add ½ tsp chili flakes or smoked paprika before roasting for a subtle kick.
2. Herb Explosion
Add fresh rosemary, thyme, or dill before roasting for extra aromatics.
3. Tomato Feta Fusion
Add cherry tomatoes to the baking dish for a burst of sweetness.
4. Feta Yogurt Sauce Finish
Mix roasted garlic and feta with Greek yogurt after baking for a creamy sauce drizzle.
5. Vegan Version
Use a vegan feta alternative and roasted garlic tahini dressing for a similar creamy, tangy flavor.
🧊 Storage & Reheating
Fridge:
Store leftovers in an airtight container for up to 4 days.
Reheat:
Reheat in the oven at 350°F for 10–15 minutes to restore crispiness.
Microwave works too (though less crisp).
Freezing:
Not recommended — feta changes texture and the potatoes can get mushy.
❓ 10 Frequently Asked Questions (FAQs)
1. What type of potatoes work best?
Yellow or gold potatoes (like Yukon Gold) offer the best balance of creaminess and crispiness.
2. Do I have to use a whole garlic head?
Not at all! You can use a few cloves or skip if you’re not a big garlic fan.
3. Can I use crumbled feta instead of a block?
Yes — just scatter it over the top of the potatoes and mix as directed.
4. Can I add protein to this dish?
Absolutely! Add chickpeas before roasting, or serve alongside grilled chicken, lamb, or tofu.
5. Is this dish gluten-free?
Yes — all ingredients are naturally gluten-free.
6. Can I prep this ahead of time?
You can cut the potatoes and pre-mix the seasoning, but it’s best roasted fresh.
7. How do I get the potatoes really crispy?
Spread them out in a single layer and don’t overcrowd the pan — and roast at high heat.
8. What can I serve this with?
Grilled meats
Greek salad
Roasted vegetables
Hummus and pita
9. Can I use other cheeses?
Yes — goat cheese or ricotta would also be delicious, though feta offers the best salt and tang.
10. Is it vegetarian-friendly?
It can be! Just make sure your feta is made with vegetarian rennet.
✅ Conclusion
These Baked Feta Potatoes are a weeknight win and a dinner party hero. Crispy, herby, creamy, and packed with Mediterranean flavor, they’re versatile, low-effort, and totally addictive. Whether you serve them as a side dish, main, or even warm salad — this recipe is all about flavor meets simplicity.
Pair them with a crisp white wine or sparkling lemonade and let the feta magic do the talking.
Street Corn Chicken Rice – A Bold, Flavor-Packed Bowl of Comfort
If you’re craving bold flavors and easy comfort food all in one, this Street Corn Chicken Rice bowl has your name written all over it. Inspired by Mexican street corn (elote), this dish takes all the best parts — grilled corn, creamy chili-lime sauce, Cotija cheese, and lime — and pairs it with tender, seasoned chicken and fluffy rice for a meal that’s satisfying, vibrant, and totally addictive.
It’s everything you want in one bowl: juicy chicken, smoky corn, zesty lime, rich mayo, and a little heat from chili powder. Whether you’re meal prepping for the week, feeding the family, or just making something crave-worthy, this bowl delivers.
And it all comes together in about 30 minutes, with pantry staples and fresh ingredients. Love dishes like Mexican Burrito Bowls or Elote Pasta Salad? Then this will be your new favorite go-to.
Large skillet or grill pan
Medium saucepan (for rice if not pre-cooked)
Knife and cutting board
Mixing bowl
Small bowl for sauce
Measuring spoons & cups
Tongs or spatula
Meat:
2 boneless (skinless chicken breasts or thighs)
Produce:
2 ears of corn (husked (or 1½ cups corn kernels))
1 avocado (diced)
2 tbsp fresh cilantro (chopped)
1 lime (cut into wedges)
1 tbsp lime juice (from fresh lime)
1 tsp garlic powder
Condiments:
¼ cup mayonnaise (or Greek yogurt for a lighter version)
Pasta & Grains:
2 cups white rice (cooked and warm)
Baking & Spices:
1⅓ tbsp chili powder
1 tsp paprika
Salt and black pepper (to taste)
Oils & Vinegars:
2 tbsp olive oil
Nuts & Seeds:
1 tsp ground cumin
Dairy:
2 tbsp butter
¼ cup Cotija cheese (crumbled (or feta if you can’t find Cotija))
Step 1: Season and Cook the Chicken
In a small bowl, mix:
1 tbsp olive oil
½ tbsp chili powder
1 tsp paprika
1 tsp cumin
Salt and pepper to taste
Rub the mixture all over the chicken breasts or thighs.
Heat a large skillet or grill pan over medium-high heat.
Add the chicken and cook for 5–7 minutes per side, or until cooked through (165°F).
Remove from pan and let rest for 5 minutes, then slice.
Step 2: Char the Corn
In the same pan, add:
2 tbsp butter
Corn (cut from cob) or thawed frozen corn
Sprinkle with ½ tbsp chili powder and 1 tsp garlic powder.
Sauté for 4–5 minutes, until golden and slightly charred.
🔥 Optional: Grill the corn on an open flame or outdoor grill for more smoky flavor.
Step 3: Make the Street Corn Sauce
In a small bowl, whisk together:
¼ cup mayonnaise
1 tbsp lime juice
½ tbsp chili powder
Salt to taste
🌶️ Add a dash of hot sauce or cayenne if you love heat!
Step 4: Assemble the Bowls
Start with a base of cooked rice in each bowl.
Top with:
Sliced chicken
Charred corn
Avocado chunks
Drizzle with the chili-lime mayo sauce.
Sprinkle with Cotija cheese and fresh cilantro.
Serve with lime wedges on the side.
🥑 Add extra toppings like pickled onions, jalapeños, or black beans if desired!
🔁 Variations
1. Shrimp Street Corn Bowl
Swap chicken for grilled or sautéed shrimp with similar seasonings.
2. Vegetarian Version
Use grilled zucchini, mushrooms, or black beans in place of chicken.
3. Vegan Street Corn Bowl
Use vegan mayo and plant-based cheese, and load up on veggies and beans.
4. Quinoa or Brown Rice Base
Substitute white rice for quinoa, cauliflower rice, or brown rice for extra fiber.
5. Extra Crunch
Add crushed tortilla chips, toasted pepitas, or crispy shallots on top.
🧊 Storage & Reheating
Storage:
Store components (rice, chicken, corn, sauce) separately in containers for up to 4 days.
Reheating:
Reheat chicken, rice, and corn in the microwave or skillet. Add avocado, sauce, and cheese after heating.
Freezer:
Cooked chicken and rice freeze well — store in freezer bags for up to 2 months.
❓ 10 Frequently Asked Questions (FAQs)
1. Can I use canned corn?
Yes — drain and dry first, then char in a hot skillet with butter and spices.
2. What if I don’t have Cotija cheese?
Use feta, queso fresco, or skip it entirely if needed.
3. Can I use chicken thighs instead of breasts?
Absolutely — thighs are juicier and work great in this dish.
4. How spicy is this dish?
Mild to moderate. Adjust chili powder and add hot sauce for more heat.
5. Can I grill everything?
Yes! Grill the chicken, corn, and even lightly grill avocado slices for smoky depth.
6. What kind of rice is best?
Jasmine or long grain white rice works best, but feel free to swap.
7. Is this dish gluten-free?
Yes, it’s naturally gluten-free as long as all ingredients are labeled GF.
8. Can I make it dairy-free?
Yes — skip the cheese and use dairy-free mayo for the sauce.
9. Is this good for meal prep?
Yes — it keeps well, just add avocado and sauce fresh.
10. Can I serve it cold?
It’s delicious warm or cold, making it perfect for lunchboxes or picnics.
✅ Conclusion
This Street Corn Chicken Rice Bowl is a flavor explosion that’s easy enough for a weeknight and impressive enough for guests. It combines the magic of Mexican street corn with tender spiced chicken, creamy chili mayo, and fresh toppings — all nestled over fluffy rice.
It’s customizable, meal-prep friendly, and just downright delicious. Whether you’re grilling or stovetop cooking, this bowl is a guaranteed hit.
There’s something incredibly magical about baking bread at home — the warmth, the aroma, the golden crust, and that first bite into a chewy, airy crumb. But what if we told you that you could achieve that bakery-style quality with just three ingredients and no kneading, no special skills, and hardly any effort?
Enter: the Unbelievable 3-Ingredient Artisan Bread. All it takes is flour, salt, and yeast. That’s it. No eggs, no milk, no oil, and no mixer. Just a bowl, a spoon, and some patience.
This rustic, crusty loaf is crackly on the outside, soft and chewy on the inside, and pairs beautifully with soups, stews, cheese boards, or just butter. Whether you’re a seasoned baker or just dipping your toe into the world of homemade bread, this recipe is a foolproof classic.
Looking for more easy baking ideas? Don’t miss No-Knead Dutch Oven Bread or Quick Skillet Flatbreads.
Large mixing bowl
Wooden spoon or silicone spatula
Plastic wrap or clean towel
Dutch oven or heavy oven-safe pot with lid
Measuring cups and spoons
Parchment paper
Cooling rack
🥖 A Dutch oven is ideal for creating that steam-filled environment that gives artisan bread its crackly crust.
3 cups all-purpose flour (or bread flour)
2 teaspoons salt
½ teaspoon instant yeast
1½ cups warm water (100–110°F)
Step 1: Mix the Dough (No Kneading!)
In a large bowl, combine:
3 cups flour
2 teaspoons salt
½ teaspoon yeast
Pour in 1½ cups warm water and stir with a spoon or spatula until a sticky, shaggy dough forms.
✅ No need to knead — just mix until everything is combined!
Step 2: Let It Rise (Slow Fermentation)
Cover the bowl with plastic wrap or a clean towel.
Let it sit at room temperature for 12–18 hours.
🕒 Yes, that long! The dough will double in size and become bubbly. This long rise develops incredible flavor and texture.
Step 3: Shape and Rest
After the first rise, dust your hands and a piece of parchment paper with flour.
Gently shape the dough into a round loaf. Don’t over-handle it — keep the air bubbles!
Place on parchment paper and cover loosely for 30–45 minutes.
Step 4: Preheat the Oven and Dutch Oven
While the dough rests, preheat your oven to 450°F (230°C).
Place your Dutch oven (with lid on) into the oven to preheat for 30 minutes.
🍞 A hot pot creates steam, which helps develop a crisp, bakery-style crust.
Step 5: Bake the Bread
Carefully remove the hot Dutch oven from the oven.
Lift the dough using the parchment paper and place it into the pot.
Cover with the lid and bake for 30 minutes.
Remove the lid and bake for another 10–15 minutes, until deep golden and crusty.
Step 6: Cool and Enjoy
Remove bread and cool on a wire rack for at least 30 minutes before slicing.
Serve with butter, olive oil, jam, or your favorite spread.
✨ Resist the urge to cut while hot — letting it cool sets the crumb structure properly.
🔁 Variations
1. Whole Wheat Version
Replace 1 cup of flour with whole wheat flour for a nuttier flavor.
2. Herb & Garlic
Stir in 1 tsp garlic powder and 1 tbsp chopped fresh rosemary or thyme.
3. Seeded Crust
Roll shaped dough in sesame, flax, or sunflower seeds before baking.
4. Cheese & Jalapeño
Mix in ½ cup shredded cheddar and sliced pickled jalapeños for a spicy kick.
5. Cranberry Walnut
Add ½ cup dried cranberries and ½ cup chopped walnuts for a sweet-savory combo.
🧊 Storage & Reheating
Storage:
Store at room temperature in a bread bag or wrapped in a kitchen towel for 2–3 days.
Avoid airtight containers — they trap moisture and soften the crust.
Freezing:
Freeze whole or sliced bread wrapped tightly in foil and placed in a freezer bag for up to 3 months.
Reheating:
Refresh in the oven at 350°F for 8–10 minutes to crisp the crust again.
Or toast slices for fresh-from-the-oven taste.
❓ 10 Frequently Asked Questions (FAQs)
1. Can I use active dry yeast?
Yes — dissolve in warm water before adding. You may need a slightly longer rise.
2. Why is my bread dense?
The dough may not have risen enough, or you used too much flour. Be sure to measure accurately and give it time to ferment.
3. Can I skip the Dutch oven?
You can use a baking stone or baking sheet with a pan of hot water in the oven for steam, but results may vary.
4. Is kneading ever necessary?
Nope! The long fermentation develops the gluten for you.
5. What if I don’t have parchment paper?
You can flour the Dutch oven well or use cornmeal to prevent sticking.
6. Can I refrigerate the dough overnight?
Yes — cold fermentation deepens the flavor. Cover and refrigerate for up to 24 hours.
7. Can I double the recipe?
Yes — just use a larger Dutch oven and increase baking time slightly.
8. What flour is best?
All-purpose works great, but bread flour gives it more chew and structure.
9. How do I know it’s done baking?
The loaf should be deeply golden and sound hollow when tapped.
10. What can I serve this with?
It’s perfect with:
Soup or stew
Cheese and charcuterie boards
Avocado toast
Garlic butter
✅ Conclusion
This Unbelievable 3-Ingredient Artisan Bread is more than just a recipe — it’s a gateway to homemade baking joy. With a golden crust, soft chewy center, and virtually no effort, it proves that anyone can bake artisan bread at home.
Whether you’re slicing it warm with butter or pairing it with your favorite pasta, this loaf is simple, rustic, and truly magical. Give it a try once, and you’ll never look at store-bought bread the same way again.
Cucumbers in Spicy Peanut Sauce – Cool, Creamy, and Crave-Worthy
Meet your new favorite side dish: Cucumbers in Spicy Peanut Sauce. This chilled cucumber salad is cool and crisp, coated in a creamy, spicy, tangy peanut sauce that’s seriously addictive. It’s a perfect contrast of refreshing crunch and bold, nutty flavor, making it an ideal side for anything from grilled chicken to noodles or rice bowls.
This recipe brings together the coolness of cucumbers, the richness of peanut butter, and the zesty heat of chili sauce, with a touch of sweetness and tang from rice vinegar and soy sauce. Think of it as a Thai or Vietnamese-inspired twist on your everyday salad.
Ready in just 10 minutes, no cooking required, and completely vegan, it’s a win for busy weeknights, potlucks, or whenever your tastebuds need a wake-up call.
Love Southeast Asian flavor profiles? You’ll also enjoy Thai Cucumber Salad or Vietnamese Noodle Bowls.
Sharp knife or mandoline slicer
Mixing bowl
Small whisk or fork – for mixing the sauce
Measuring cups and spoons
Garlic press or microplane (optional)
Serving plate or bowl
For the Cucumbers:
4 –5 Persian cucumbers (or 2 English cucumbers, thinly sliced)
For the Spicy Peanut Sauce:
3 tablespoons creamy peanut butter
1 tablespoon soy sauce (or tamari for gluten-free)
1 tablespoon rice vinegar
1 teaspoon sesame oil
1 tablespoon chili crisp or chili garlic sauce
1 teaspoon maple syrup or honey
1 garlic clove (minced or grated)
1 –2 tablespoons warm water (to thin the sauce as needed)
Garnish:
1 tablespoon roasted peanuts (crushed)
1 teaspoon sesame seeds
Chopped cilantro or scallions (optional)
🌶️ Adjust chili level depending on your spice preference — make it bold or keep it mild!
Step 1: Prepare the Cucumbers
Wash and dry cucumbers.
Slice them thinly using a sharp knife or mandoline.
Place in a large mixing bowl or colander.
✅ For extra crunch: salt the cucumbers with ¼ tsp salt, let them sit for 10 minutes, then pat dry to remove excess moisture.
Step 2: Make the Spicy Peanut Sauce
In a small bowl, whisk together:
Peanut butter
Soy sauce
Rice vinegar
Sesame oil
Chili garlic sauce
Maple syrup
Garlic
Add 1–2 tablespoons of warm water slowly until the sauce becomes smooth and pourable.
Step 3: Toss and Combine
Pour the peanut sauce over the cucumbers.
Toss gently to coat all slices evenly.
Transfer to a serving bowl or plate.
Step 4: Garnish and Serve
Sprinkle with crushed peanuts, sesame seeds, and chopped herbs (if using).
Serve immediately, or chill for 10–15 minutes for enhanced flavor.
🔁 Variations
1. Thai-Inspired
Add a splash of fish sauce and a squeeze of lime juice.
2. Crunchy Slaw Version
Add shredded cabbage, carrots, or red bell pepper for a slaw-style mix.
3. Noodle Bowl Add-On
Serve over cold soba noodles or rice noodles for a full meal.
4. Sweet & Spicy
Increase maple syrup or honey for a sweeter kick.
5. Nut-Free Version
Use sunflower seed butter or tahini in place of peanut butter.
🧊 Storage & Reheating
Refrigerator:
Store in an airtight container for up to 2–3 days.
Best enjoyed within the first 24 hours when cucumbers are crisp.
Freezer:
Not recommended. Cucumbers and peanut sauce don’t freeze well.
Reheating:
None needed — serve chilled or at room temperature.
🥶 If the sauce thickens in the fridge, stir in a splash of water or rice vinegar to loosen it.
❓ 10 Frequently Asked Questions (FAQs)
1. Can I use chunky peanut butter?
Yes — it adds texture! Just stir well so the sauce blends evenly.
2. Is this dish spicy?
It has a kick from the chili crisp or sauce, but you can easily adjust or omit for a milder version.
3. Can I use different cucumbers?
Absolutely — English cucumbers work great. Just avoid standard waxy cucumbers unless peeled and seeded.
4. Is it gluten-free?
Yes, if you use tamari or coconut aminos instead of soy sauce.
5. What pairs well with this dish?
It’s amazing with:
Grilled chicken or tofu
Rice or noodle bowls
Dumplings or bao buns
6. Can I prep this ahead of time?
Yes — but dress just before serving to maintain crunch.
7. What can I use instead of rice vinegar?
Try lime juice or apple cider vinegar in a pinch.
8. Is it vegan?
Yes — use maple syrup instead of honey for a fully plant-based version.
9. How do I make it less spicy?
Use less chili oil or sauce, and balance with a little extra sugar or lime juice.
10. Can I make a bigger batch?
Absolutely! Just double or triple the sauce ingredients and keep proportions the same.
✅ Conclusion
This Cucumbers in Spicy Peanut Sauce dish is the perfect mashup of refreshing crunch and bold, spicy-sweet flavor. It’s the side salad that steals the show — creamy, tangy, nutty, and incredibly satisfying.
Make it once, and you’ll find yourself reaching for it again and again — as a snack, a side, or even a topping for bowls and wraps. It’s a flavor explosion with minimal effort.
Easy Asian Cucumber Salad – Fresh, Crunchy, and Full of Flavor
Sometimes, the simplest recipes pack the boldest punch — and that’s exactly what this Easy Asian Cucumber Salad delivers. Crisp, cool Persian cucumbers are tossed in a zesty dressing made from soy sauce, rice vinegar, sesame oil, garlic, and chili oil, then finished with a sprinkle of sesame seeds for the perfect crunch and spice combo.
Whether you’re serving it as a quick appetizer, a fresh side for noodles, rice bowls, or grilled meats, or just enjoying it as a refreshing snack, this salad is light, healthy, and wildly addictive.
It comes together in just 10 minutes and keeps well in the fridge, making it ideal for meal prep or hosting. And with zero cooking required, it’s as easy as slice, toss, and enjoy!
Love simple Asian-inspired sides? You’ll also enjoy Spicy Korean Cucumber Salad or Sesame Noodle Bowls.
Cutting board & sharp knife
Mixing bowl
Garlic press or microplane (optional)
Measuring spoons
Spoon or spatula for mixing
Serving bowl or plate
Produce:
5 Persian cucumbers (sliced)
½ tablespoon garlic (finely minced or grated)
Condiments & Oils:
¾ tablespoon light soy sauce
¾ tablespoon rice vinegar
½ tablespoon sesame oil
1 tablespoon chili oil (adjust to taste)
Baking & Spices:
½ tablespoon sesame seeds
½ tablespoon sugar
½ teaspoon salt
🥒 Persian cucumbers are ideal because they’re crisp, thin-skinned, and nearly seedless — no peeling needed!
Step 1: Slice the Cucumbers
Wash and dry the Persian cucumbers.
Slice thinly on a diagonal or into rounds, about ⅛ inch thick for max surface area and texture.
Add to a large mixing bowl.
✅ Want extra crunch? Lightly salt and let the cucumbers sit for 10 minutes, then drain excess water before adding the dressing.
Step 2: Make the Dressing
In a small bowl or directly in the cucumber bowl, whisk together:
Soy sauce
Rice vinegar
Sesame oil
Chili oil
Sugar
Salt
Minced garlic
Mix well until sugar and salt dissolve and the dressing is glossy.
Step 3: Toss and Garnish
Pour the dressing over the sliced cucumbers.
Toss to coat evenly using clean hands or a spatula.
Sprinkle with sesame seeds and give it a final toss.
Step 4: Chill (Optional) & Serve
Serve immediately, or chill for 10–15 minutes for extra flavor.
Garnish with extra sesame seeds, scallions, or crushed peanuts if desired.
🔁 Variations
1. Korean-Inspired
Add gochugaru (Korean chili flakes) and a splash of fish sauce for a spicy, funky kick.
2. Creamy Sesame Cucumber Salad
Add 1 tablespoon of tahini or peanut butter to the dressing for a nutty twist.
3. Crunchier Version
Toss in sliced radishes, bean sprouts, or julienned carrots for texture.
4. Sweet & Tangy
Use honey or maple syrup instead of sugar for a natural sweetness.
5. Protein-Packed
Serve with sliced grilled chicken, tofu, or even boiled eggs to make it a light meal.
🧊 Storage & Reheating
Refrigerator:
Store leftovers in an airtight container for up to 3 days.
The cucumbers will soften slightly but still taste great.
Freezer:
Not recommended. Cucumbers become watery and mushy after freezing.
Reheating:
Not needed — this salad is served chilled or at room temperature.
🥶 Pro tip: Make a double batch and enjoy throughout the week with rice bowls or grilled dishes!
❓ 10 Frequently Asked Questions (FAQs)
1. Can I use regular cucumbers instead of Persian?
Yes, but English cucumbers are a better swap due to their thinner skin and fewer seeds. Slice thin and pat dry if using standard cucumbers.
2. Is this salad spicy?
It can be! Adjust the chili oil and garlic to your heat preference.
3. Can I make it ahead of time?
Yes — it tastes even better after marinating for 15–30 minutes in the fridge.
4. Is it vegan and gluten-free?
Yes — use tamari or gluten-free soy sauce to keep it gluten-free.
5. What’s the best way to slice cucumbers?
Use a sharp knife or mandoline for even, thin slices.
6. Can I add herbs?
Yes! Fresh cilantro, mint, or Thai basil all work beautifully.
7. What can I serve this with?
Try with:
Grilled chicken or tofu
Ramen or rice bowls
Asian BBQ
Dumplings
8. Can I double the recipe?
Absolutely! Just scale the dressing ingredients accordingly.
9. Does this salad get soggy?
Over time, yes. It’s best eaten within 24 hours for optimal crunch.
10. What if I don’t have chili oil?
Use red pepper flakes in sesame oil or make a quick chili oil with neutral oil, garlic, and crushed red pepper.
✅ Conclusion
This Easy Asian Cucumber Salad is a crisp, refreshing, flavor-packed side that takes just minutes to make. Whether you’re pairing it with spicy noodles, grilled proteins, or enjoying it solo, it’s guaranteed to become a staple in your rotation.
It’s vegan, gluten-free, endlessly adaptable, and perfect for warmer months or as a palate cleanser between richer dishes.
Once you make it, you’ll keep coming back for more.
Creamy Sausage Rigatoni – A Cozy, One-Pot Pasta Packed with Flavor
When you’re craving something rich, comforting, and downright crave-worthy, this Creamy Sausage Rigatoni hits every note. Tender pasta coated in a velvety tomato cream sauce, juicy bits of Italian sausage, and fresh spinach stirred in for a little green goodness — it’s the kind of dish that makes you go back for seconds… or thirds. 🍝🔥
Whether you’re cooking for your family, a cozy date night, or meal prepping for the week, this one-pot pasta recipe is simple yet bursting with flavor. The blend of tomato sauce, heavy cream, garlic, and Italian sausage creates a sauce that hugs each rigatoni tube perfectly.
If you love creamy pasta recipes like Tuscan Chicken Pasta or Creamy Sun-Dried Tomato Rigatoni, then this dish is going to be your new go-to weeknight dinner.
Large, deep skillet or Dutch oven
Wooden spoon or spatula
Measuring cups and spoons
Chef’s knife and cutting board
Grater (if topping with Parmesan)
Protein & Base:
1 tablespoon olive oil – for sautéing
15 oz Italian sausage (crumbled – use sweet or spicy depending on your preference)
4 cloves garlic (minced)
Pasta & Sauce:
8 oz rigatoni (uncooked)
1 cup chicken broth
1 cup heavy cream
15 oz tomato sauce or marinara
1 teaspoon Italian seasoning or Herbs de Provence
Salt & coarsely ground black pepper (to taste)
Red pepper flakes (optional, for heat)
Add-ins:
5 oz fresh spinach – optional but highly recommended
Heat olive oil in a large skillet over medium heat.
Add the crumbled sausage and sauté for about 6–8 minutes, or until fully browned.
Stir in garlic and cook for another 30 seconds until fragrant.
Step 2: Add the Liquids & Pasta
Pour in:
Chicken broth
Heavy cream
Tomato sauce
Italian seasoning
A pinch of red pepper flakes (if using)
Stir to combine, then add rigatoni directly into the skillet.
Bring the mixture to a gentle simmer, then reduce heat to low.
🍝 No need to boil the pasta separately – it cooks right in the sauce and soaks up all that flavor!
Step 3: Simmer Until Pasta is Tender
Cover and let it simmer for 13–15 minutes, stirring occasionally to prevent sticking.
Check the pasta — it should be al dente, and the sauce will have thickened beautifully.
Step 4: Finish with Spinach
Stir in fresh spinach and cook for 1–2 minutes, just until wilted.
Taste and adjust with salt and black pepper as needed.
Step 5: Serve & Enjoy!
Plate the pasta into bowls and top with freshly grated Parmesan and a drizzle of olive oil or chili flakes for extra flair.
Serve with garlic bread or a simple salad for a complete meal.
🔁 Variations
1. Make It Vegetarian
Swap sausage for plant-based sausage, sautéed mushrooms, or chickpeas.
2. Extra Creamy
Add ½ cup grated Parmesan directly into the sauce for a cheesier finish.
3. Add Vegetables
Stir in sautéed mushrooms, zucchini, or roasted red peppers with the spinach.
4. Spicy Lovers’ Version
Use spicy Italian sausage and double the red pepper flakes.
5. Baked Pasta
Transfer cooked pasta to a baking dish, top with mozzarella, and broil for 3–5 minutes until bubbly.
🧊 Storage & Reheating
Refrigerator:
Store in an airtight container for up to 4 days.
Freezer:
Freeze in meal prep containers for up to 2 months.
Thaw overnight in the fridge before reheating.
Reheating:
Warm gently in a skillet or microwave, adding a splash of cream or broth to loosen the sauce.
❓ 10 Frequently Asked Questions (FAQs)
1. Can I use penne or another pasta?
Yes! Penne, fusilli, or even fettuccine work well — just adjust cooking time slightly.
2. Is it spicy?
Only mildly — adjust red pepper flakes and use sweet sausage for a milder version.
3. Can I use milk instead of cream?
You can, but the sauce will be less rich and creamy. Whole milk works best if substituting.
4. What kind of sausage works best?
Sweet or spicy Italian sausage, chicken sausage, or any ground seasoned sausage.
5. Can I make this in advance?
Yes — it reheats well and is perfect for meal prep.
6. Can I add cheese to the sauce?
Absolutely! Add ½ cup shredded mozzarella or Parmesan at the end.
7. Can I cook the pasta separately?
You could, but cooking it in the sauce makes it more flavorful and cuts down on dishes.
8. What wine pairs well with this?
A bold Chianti or Cabernet pairs beautifully with the creamy tomato sauce.
9. Can I make it gluten-free?
Yes — use your favorite gluten-free rigatoni or penne.
10. What can I serve on the side?
Garlic bread
Caesar salad
Steamed green beans
Roasted veggies
✅ Conclusion
This Creamy Sausage Rigatoni is the perfect one-pot meal — warm, rich, and packed with Italian-inspired comfort. With just the right balance of savory sausage, garlicky cream sauce, tender pasta, and vibrant spinach, it’s a crowd-pleasing dinner that feels gourmet, but takes under 40 minutes from start to finish.
Whether you’re cooking for the whole family or just want leftovers you’ll actually look forward to, this recipe is a guaranteed winner.
Crispy Chicken Katsu: Crunchy & Delicious Japanese Comfort Food
Craving something crispy, juicy, and deeply satisfying? Say hello to Chicken Katsu — Japan’s answer to comfort food. With a perfectly golden Panko crust and tender, juicy chicken inside, this beloved dish is easy to make at home and just as good (if not better!) than your favorite Japanese restaurant.
Chicken Katsu is a Japanese-style breaded chicken cutlet — similar to a schnitzel — served sliced and typically paired with tonkatsu sauce, shredded cabbage, and a bowl of fluffy rice. It’s crispy, flavorful, and so comforting. Whether you’re making it for a cozy dinner or a weekend treat, it’s a meal the whole family will love.
If you’re a fan of Japanese cuisine, you’ll also love Teriyaki Chicken or Japanese Curry.
Sharp knife and cutting board
Mixing bowls (3 for breading)
Meat mallet or rolling pin (optional for pounding chicken)
Large skillet or frying pan
Tongs or slotted spatula
Paper towels
Wire rack (optional, for draining)
For the Chicken Katsu:
2 boneless (skinless chicken breasts, halved into cutlets)
½ tsp salt
¼ tsp black pepper
½ cup all-purpose flour
2 large eggs (beaten)
1½ cups Panko breadcrumbs (Japanese-style)
Vegetable oil (for frying)
Optional Serving Sides:
Shredded cabbage
Cooked white rice or steamed Japanese rice
Lemon wedges
Green onions (thinly sliced)
Tonkatsu sauce (store-bought or homemade — see below)
Homemade Tonkatsu Sauce (Optional):
¼ cup ketchup
2 tbsp Worcestershire sauce
1 tbsp soy sauce
1 tsp sugar
½ tsp Dijon mustard (optional)
Step 1: Prepare the Chicken
Slice each chicken breast in half horizontally to make 4 thinner cutlets.
If needed, pound each cutlet to even thickness (about ½ inch thick) using a mallet.
Season both sides with salt and black pepper.
Step 2: Set Up Breading Station
Prepare 3 shallow bowls:
Flour in the first bowl
Beaten eggs in the second
Panko breadcrumbs in the third
✅ Panko is essential for that authentic, ultra-crunchy texture!
Step 3: Bread the Chicken
Dredge each cutlet in flour, coating both sides and shaking off excess.
Dip into egg wash, letting the excess drip off.
Press into Panko, pressing firmly to coat fully.
Repeat with all cutlets and place on a plate or tray.
Step 4: Fry the Chicken
Heat ½ inch of oil in a large skillet over medium-high heat (350°F / 175°C).
Carefully place 1–2 cutlets in the oil (don’t overcrowd).
Fry for 3–4 minutes per side, or until golden brown and cooked through (165°F internal temp).
Transfer to a paper towel-lined plate or wire rack.
Step 5: Make the Tonkatsu Sauce (Optional)
In a small bowl, mix:
Ketchup
Worcestershire
Soy sauce
Sugar
Mustard (if using)
Stir until smooth. Taste and adjust sweetness or saltiness to preference.
Step 6: Serve!
Slice chicken into strips and serve over steamed rice with shredded cabbage, lemon wedges, and a drizzle of tonkatsu sauce.
🔁 Variations
1. Spicy Katsu
Add 1 tsp chili powder or cayenne to the Panko for a spicy kick.
2. Chicken Katsu Sandwich (Katsu Sando)
Serve crispy chicken on soft white bread with cabbage and tonkatsu sauce — Japanese sandwich perfection!
3. Baked Chicken Katsu
Spray breaded cutlets with oil and bake at 425°F for 20–25 minutes, flipping halfway.
4. Air Fryer Katsu
Air fry at 400°F for 10–12 minutes, flipping once.
5. Katsu Donburi (Katsudon)
Serve Katsu over rice and pour a lightly sweet soy-onion-egg mixture over top.
🧊 Storage & Reheating
Refrigerator:
Store cooked katsu in an airtight container for up to 3 days.
Freezer:
Freeze cooked or uncooked breaded chicken for up to 2 months. Separate layers with parchment paper.
Reheat:
Oven: 350°F for 10 minutes
Air Fryer: 350°F for 5–7 minutes
Avoid microwave to maintain crispiness
❓ 10 Frequently Asked Questions (FAQs)
1. What’s the difference between Chicken Katsu and Tonkatsu?
Chicken Katsu uses chicken; Tonkatsu uses pork cutlets. Both are breaded and fried the same way.
2. Can I use chicken thighs?
Yes — boneless, skinless chicken thighs are juicy and work great.
3. Is Chicken Katsu gluten-free?
Not by default. Use GF flour, GF Panko, and tamari in the sauce to make it gluten-free.
4. Can I make this without deep frying?
Yes — bake or air fry using the same breading steps.
5. What oil is best for frying?
Use neutral oils like canola, vegetable, or peanut oil with a high smoke point.
6. Can I prep this ahead of time?
Yes — bread the cutlets and refrigerate for up to 1 day before frying.
7. What is tonkatsu sauce made of?
A blend of ketchup, Worcestershire, soy sauce, and sugar. It’s sweet, tangy, and umami-rich.
8. Do I need to pound the chicken?
It helps for even cooking and tenderness, but it’s optional if the cutlets are already thin.
9. What goes well with Chicken Katsu?
Try it with:
Steamed rice
Miso soup
Shredded cabbage
Pickled veggies
10. Can I make a vegetarian version?
Yes! Try using tofu, eggplant, or zucchini instead of chicken.
✅ Conclusion
This Crispy Chicken Katsu recipe brings you the crunch, comfort, and flavor of Japanese cuisine — right from your own kitchen. Whether you’re enjoying it as a simple dinner, building a bento box, or layering it into a sandwich, Chicken Katsu is the kind of dish that turns ordinary ingredients into crispy, golden magic.
With its quick prep, satisfying texture, and versatile serving options, this dish will be a regular favorite at your table.
Easy Cheeseburger Soup – Hearty, Creamy & Packed with All Your Burger Favorites
If you love cheeseburgers, you are going to be obsessed with this Easy Cheeseburger Soup. Imagine everything you love about a juicy bacon cheeseburger — ground beef, sharp cheddar, pickles, potatoes, and crispy bacon — turned into a warm, creamy, comforting bowl of soup. 🍔🥣🧀
This one-pot recipe is hearty, family-friendly, and super satisfying, perfect for cold nights, game-day meals, or whenever you’re craving comfort food with a twist. It’s like fast food met homemade comfort — and they fell in love.
And with simple ingredients, pantry staples, and 40 minutes or less from start to finish, this is a recipe you’ll come back to again and again.
If you love cozy, crave-worthy meals, also check out Bacon Cheeseburger Casserole or Loaded Potato Soup.
Large pot or Dutch oven
Wooden spoon or spatula
Measuring cups & spoons
Cutting board & knife
Vegetable peeler – for potatoes
Ladle – for serving
Small whisk – for roux (flour + butter mixture)
Meat:
1 lb ground beef
5 slices bacon (chopped)
Produce:
2 celery stalks (diced)
¼ cup onion (diced)
½ tsp garlic (minced)
1 lb Yukon gold potatoes (peeled and diced)
Canned Goods:
4 cups chicken broth
Condiments:
1 tsp Worcestershire sauce
¼ cup chopped pickles (plus extra for garnish, optional)
Baking & Spices:
6 tbsp all-purpose flour
Salt & black pepper (to taste)
Dairy:
¼ cup butter
2 cups sharp cheddar cheese (shredded)
1 cup heavy cream
Step 1: Cook the Bacon
In a large pot or Dutch oven, cook the chopped bacon over medium heat until crispy.
Use a slotted spoon to transfer the bacon to a plate lined with paper towels. Leave about 1 tablespoon of the bacon grease in the pot.
Step 2: Cook the Ground Beef & Veggies
In the same pot, add ground beef and cook until browned, about 6–8 minutes.
Add onion, celery, and garlic and cook until soft and fragrant, about 4–5 minutes.
Drain excess fat if needed.
Step 3: Add Potatoes & Broth
Stir in the diced potatoes, Worcestershire sauce, and chicken broth.
Bring to a boil, then reduce heat and simmer for 10–12 minutes, or until potatoes are tender.
Step 4: Make the Roux
In a small saucepan, melt ¼ cup butter over medium heat.
Whisk in 6 tbsp flour and cook for 2 minutes, whisking constantly to form a roux.
Gradually add to the soup pot, stirring to combine and thicken the broth.
Step 5: Stir in Cream & Cheese
Reduce heat to low and stir in heavy cream, cheddar cheese, and chopped pickles.
Stir until cheese is fully melted and soup is creamy.
Step 6: Serve
Ladle into bowls and top with crispy bacon, extra cheddar, pickles, and freshly cracked pepper.
Serve with toasted buns, garlic bread, or crackers.
🔁 Variations
1. Low-Carb Cheeseburger Soup
Swap potatoes for cauliflower florets or radishes for fewer carbs.
2. Spicy Cheeseburger Soup
Add diced jalapeños, a dash of hot sauce, or use pepper jack cheese.
3. Cheeseburger Mac Soup
Stir in cooked elbow macaroni at the end for a pasta version.
4. Pickle Lovers’ Version
Add pickle juice (1–2 tbsp) for a tangy twist.
5. Vegetarian Version
Use meatless ground beef, vegetable broth, and skip the bacon.
🧊 Storage & Reheating
Fridge:
Store leftovers in an airtight container for up to 4 days.
Freezer:
Freeze in portioned containers for up to 2 months.
Thaw overnight in the refrigerator.
Reheating:
Reheat gently on the stovetop over low-medium heat, or microwave in 60-second bursts, stirring in between.
⚠️ If soup thickens too much, add a splash of broth or cream to loosen it.
❓ 10 Frequently Asked Questions (FAQs)
1. Can I make this soup ahead of time?
Yes — it reheats beautifully and even tastes better the next day.
2. Can I use ground turkey or chicken?
Absolutely! Both work as leaner options.
3. Do I have to use pickles?
Not at all — but they add that signature cheeseburger tang.
4. Can I use milk instead of heavy cream?
Yes, but the soup will be a bit thinner. You can also use half-and-half.
5. What’s the best cheese for this soup?
Sharp cheddar melts well and adds bold flavor — always shred your own for best texture.
6. Can I make this in a slow cooker?
Yes — cook the bacon and beef first, then add everything except the cheese and cream. Cook on low for 6 hours, then stir in dairy at the end.
7. What goes well with cheeseburger soup?
Garlic bread, crusty rolls, or a green salad.
8. Is this soup gluten-free?
Not by default — use GF flour or cornstarch slurry to thicken instead.
9. Can I make this soup thinner?
Sure — just add a bit more broth or cream to adjust consistency.
10. What can I use instead of Yukon potatoes?
Russet or gold potatoes both work well — avoid waxy varieties like red potatoes.
✅ Conclusion
This Easy Cheeseburger Soup is the definition of comfort in a bowl — hearty, creamy, cheesy, and full of classic burger flavor. From the crispy bacon and ground beef to the melted cheddar and hidden pickle tang, every spoonful is deeply satisfying.
It’s an easy one-pot recipe that’s perfect for cozy nights, busy weeks, or feeding a hungry crowd — and it always hits the spot.
Try it once, and it just might become your new favorite soup!
Easy Pepper Jack Crack Chicken – Creamy, Cheesy, Slow Cooker Comfort Food with a Kick
When you combine creamy ranch flavors, spicy pepper jack cheese, crispy bacon, and juicy chicken, you get a dish that’s truly addictive. Meet your new favorite comfort food: Easy Pepper Jack Crack Chicken. 🍗🔥🧀
This simple, dump-and-go slow cooker recipe takes classic Crack Chicken up a notch with melty, spicy pepper jack cheese that adds just the right amount of heat. It’s a perfect set-it-and-forget-it recipe — just toss the ingredients in your crockpot, and a few hours later, you’ve got a creamy, cheesy, bacon-filled masterpiece.
Whether you serve it over rice, on buns, in wraps, or by itself with a fork, this recipe will keep your family coming back for more!
Love slow cooker comfort food? Don’t miss Slow Cooker Mississippi Chicken and Crockpot Buffalo Chicken Dip.
Slow cooker / Crockpot (4–6 qt)
Cutting board & knife
Measuring cups & spoons
Forks or hand mixer (for shredding the chicken)
Spatula or spoon – for mixing
Optional: Skillet for crisping bacon (if not using pre-cooked)
Meat:
2 lbs boneless (skinless chicken breasts)
½ cup cooked bacon (crumbled (about 5–6 slices))
Dairy:
8 oz cream cheese (cubed)
1 cup shredded pepper jack cheese
Produce:
¼ cup chopped green onions
½ tsp garlic powder
½ tsp onion powder
Canned Goods:
½ cup chicken broth
Spices & Seasonings:
1 packet ranch seasoning mix
¼ tsp black pepper
Optional toppings: extra cheese, jalapeños, hot sauce, or chopped fresh parsley.
Step 1: Add Ingredients to the Slow Cooker
Place chicken breasts in the bottom of the Crockpot.
Sprinkle with ranch seasoning, garlic powder, onion powder, and black pepper.
Add cream cheese cubes and pour in chicken broth.
🔥 Want it even spicier? Add a few sliced jalapeños or a pinch of cayenne right now!
Step 2: Cook
Cover and cook on
Chicken should be fork tender and easy to shred.
Step 3: Shred and Mix
Once the chicken is cooked, shred it right in the slow cooker using two forks or a hand mixer.
Stir everything together until well combined and creamy.
Step 4: Add Cheese & Bacon
Stir in:
Shredded pepper jack cheese
Crispy bacon
Cover and cook for another 5–10 minutes, until cheese is fully melted.
Step 5: Garnish and Serve
Top with chopped green onions before serving.
Serve warm on:
Toasted buns or slider rolls
Over white rice or cauliflower rice
Inside lettuce wraps or flour tortillas
Or just eat with a fork!
🔁 Variations
1. Crack Chicken Pasta
Stir in cooked pasta after shredding chicken and heat through.
2. Loaded Crack Chicken Dip
Serve warm with tortilla chips as a party dip — top with more cheese and bacon!
3. Spicy Southwest Style
Add diced green chiles, corn, and black beans before cooking.
4. Low Carb Version
Skip the bun and serve over steamed veggies or cauliflower mash.
5. Crack Chicken Tacos
Use it as taco filling with avocado, shredded lettuce, and sour cream.
🧊 Storage & Reheating
Refrigerator:
Store leftovers in an airtight container for up to 4 days.
Freezer:
Freeze cooled chicken in a freezer-safe bag for up to 2 months.
Thaw overnight in the fridge before reheating.
Reheat:
Microwave in 60–90 second intervals, or reheat on the stovetop over low heat with a splash of broth or milk.
❓ 10 Frequently Asked Questions (FAQs)
1. Can I use chicken thighs instead of breasts?
Yes! Thighs are juicy and work great — use boneless, skinless thighs.
2. Is this keto or low carb?
Yes — it’s naturally low in carbs and high in fat and protein.
3. Can I make it in the Instant Pot?
Yes! Pressure cook on High for 15 minutes with natural release, then shred and stir in cheese and bacon.
4. Can I prep it the night before?
Absolutely — layer everything (except bacon and shredded cheese) in the slow cooker insert, cover, and refrigerate overnight.
5. Can I use pre-cooked rotisserie chicken?
Yes — add it at the end and cook just until warm, then stir in cheese and bacon.
6. What if I don’t like spicy cheese?
Use mild cheddar or Monterey Jack instead of pepper jack.
7. Can I double the recipe?
Yes — use a 6- or 7-quart slow cooker and increase cook time slightly.
8. What sides go well with this dish?
Try steamed broccoli, roasted sweet potatoes, salad, or coleslaw.
9. Is there a dairy-free version?
You can try plant-based cream cheese and cheese, though results may vary.
10. Can I make it into a casserole?
Yes! Layer into a baking dish, top with more cheese and bacon, and bake at 375°F for 10–15 minutes until bubbly.
✅ Conclusion
This Easy Pepper Jack Crack Chicken is the ultimate creamy, cheesy comfort food. With its bold flavor, spicy cheese, ranch-infused chicken, and crispy bacon, it’s easy to see why this recipe is called “crack” chicken — it’s seriously addictive.
Perfect for weeknight meals, potlucks, game day, or even meal prep, it’s a must-try slow cooker classic with a spicy twist.
Serve it over rice, in buns, on a salad, or straight from the spoon — however you do it, this recipe brings BIG flavor with minimal effort.