Category: Lunch

  • The Chicken Pasta Recipe of Your Dreams – Creamy, Savory, and Packed with Flavor

    The Chicken Pasta Recipe of Your Dreams – Creamy, Savory, and Packed with Flavor

    The Chicken Pasta Recipe of Your Dreams – Creamy, Savory, and Packed with Flavor

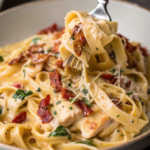
    If you’ve been searching for that perfect pasta dish—creamy, hearty, and utterly irresistible—look no further. This Chicken Pasta Recipe of Your Dreams is everything you want in comfort food: succulent seared chicken breasts, crispy bacon, sweet-tart bursts of sun-dried tomatoes, and a velvety cream sauce infused with garlic, white wine, and Parmesan. This dish is elegant enough for date night but easy enough for a cozy weeknight dinner. Plus, the creamy sauce clings beautifully to strands of fettuccine, making every forkful a luxurious experience. Pair it with a simple green salad, a glass of crisp white wine, and some crusty bread to soak up all that glorious sauce. Trust me—you’ll want to savor every last drop.

    • Meat
    • 2 chicken breasts (thinly sliced)
    • 120 g bacon (cooked and crumbled)
    • Produce
    • 70 g baby spinach (fresh)
    • 2 cloves garlic (minced)
    • 100 g sun-dried tomatoes (drained and sliced)
    • Fresh parsley (chopped (for garnish))
    • Canned Goods
    • ½ cup chicken broth (low sodium)
    • Pasta & Grains
    • 300 g fettuccine
    • Baking & Spices
    • ½ tsp salt and pepper (or to taste)
    • Dairy
    • 30 g butter
    • 1¼ cups cream
    • ¾ cup Parmesan cheese (grated)
    • Extra Parmesan (for serving)
    • Beer (Wine & Liquor)
    • ½ cup dry white wine

    Step 1: Cook the Pasta

    1. Bring a large pot of salted water to a boil.
    2. Cook fettuccine according to package instructions until al dente.
    3. Reserve ½ cup of pasta water, then drain and set aside.

    Step 2: Cook the Chicken & Bacon

    1. In a large skillet over medium heat, cook the bacon until crispy. Remove and crumble; set aside.
    2. Season the chicken breasts with a pinch of salt and pepper.
    3. In the same pan, add butter. Cook chicken slices for about 3–4 minutes per side, until golden and cooked through. Remove and set aside.

    Step 3: Build the Creamy Sauce

    1. In the same pan, lower the heat to medium-low.
    2. Add minced garlic, cooking until fragrant (about 1 minute).
    3. Pour in the white wine, deglazing the pan and scraping up any browned bits. Let it simmer for 2–3 minutes.
    4. Add chicken broth and cream, stirring to combine.
    5. Bring the sauce to a gentle simmer, then stir in:
    6. Parmesan cheese
    7. Sun-dried tomatoes
    8. Season with salt and pepper, to taste
    9. Let the sauce cook for 3–4 minutes, until slightly thickened.

    Step 4: Combine Everything

    1. Add cooked fettuccine to the sauce, tossing to coat.
    2. If the sauce is too thick, loosen it with a bit of the reserved pasta water.
    3. Stir in baby spinach and let it wilt.
    4. Return the cooked chicken and bacon to the pan, tossing gently to combine.

    Step 5: Serve & Enjoy

    1. Serve immediately, garnished with:
    2. Fresh parsley
    3. Extra Parmesan cheese
    4. Pair with a chilled glass of dry white wine and warm, crusty bread.

    🍴 Variations
    1. Spicy Version
    Add a pinch of crushed red pepper flakes to the sauce for gentle heat.

    2. Seafood Twist
    Swap chicken for shrimp or seared scallops.

    3. Vegetarian Delight
    Omit the chicken and bacon, and add sautéed mushrooms and extra spinach.

    4. Gluten-Free Option
    Use gluten-free pasta and double-check your broth and other ingredients for hidden gluten.

    5. Herbaceous Upgrade
    Add fresh basil or thyme for an aromatic finish.

    ❄️ Storage & Reheating
    Storage:
    Store leftovers in an airtight container in the fridge for up to 3 days.

    Reheating:
    Reheat gently in a skillet over medium heat.

    Add a splash of milk or cream to revive the sauce’s creamy texture.

    Freezing:
    Not recommended, as the cream sauce may separate when thawed.

    🙋‍♀️ 10 Frequently Asked Questions
    1. Can I use chicken thighs instead of breasts?
    Yes! Chicken thighs add extra juiciness and flavor.

    2. What wine is best for cooking this recipe?
    Choose a dry white wine like Sauvignon Blanc or Pinot Grigio.

    3. Can I use jarred sun-dried tomatoes in oil?
    Absolutely. Drain them well before slicing.

    4. Is there a lighter version of the sauce?
    Use half-and-half or evaporated milk for a lighter, but still creamy result.

    5. Can I make this ahead of time?
    You can prep the sauce and protein ahead, then cook the pasta and assemble just before serving.

    6. Will frozen spinach work?
    Yes, just thaw and squeeze out excess moisture before adding.

    7. Can I skip the wine?
    Sure. Substitute with extra chicken broth or a splash of lemon juice for brightness.

    8. How do I make it extra saucy?
    Increase the cream to 1½ cups and add more Parmesan.

    9. What protein alternatives work here?
    Try turkey, ham, or even rotisserie chicken for a quick option.

    10. What can I serve on the side?
    Garlic bread

    Simple green salad

    Roasted vegetables

    ✨ Conclusion
    This truly is the chicken pasta recipe of your dreams. Creamy, indulgent, and brimming with layers of flavor, it checks every box for a comforting, elegant meal. With the savory bacon, tender chicken, sun-dried tomatoes, and that silky Parmesan cream sauce, this dish is as much a feast for the eyes as it is for the taste buds.

    Make it for dinner parties, special occasions, or whenever you need a little food hug. And don’t forget a good piece of bread—you won’t want to leave a drop of that sauce behind!

  • Southern Style Baked Chicken Ricotta Meatballs with Creamy Spinach Alfredo Sauce

    Southern Style Baked Chicken Ricotta Meatballs with Creamy Spinach Alfredo Sauce

    Southern Style Baked Chicken Ricotta Meatballs with Creamy Spinach Alfredo Sauce

    If you’re looking for a dish that wraps you in comfort and nostalgia, this Southern Style Baked Chicken Ricotta Meatballs with Creamy Spinach Alfredo Sauce is a treasure. Tender, juicy chicken meatballs, enriched with creamy ricotta cheese, are baked to perfection and smothered in a decadent spinach Alfredo sauce that’s velvety smooth and full of flavor. Growing up in the rural heartland, dishes like this were the soul of family dinners. The richness of the creamy Alfredo sauce, the softness of the ricotta meatballs, and the slight earthiness from fresh spinach combine into a dish that feels like a warm hug on a plate. My mother used to make this for Sunday dinners, and to this day, it remains a comfort food classic that transports me right back to our bustling kitchen. Pair these meatballs with a side of garlic mashed potatoes, buttered herb rice, or even a crisp arugula salad with vinaigrette. And don’t forget a slice of crusty bread to mop up that silky sauce!

    • For the Chicken Ricotta Meatballs
    • 1 lb ground chicken
    • 1 cup ricotta cheese
    • 1 egg
    • ½ cup grated Parmesan cheese
    • ½ cup breadcrumbs
    • 2 cloves garlic (minced)
    • ¼ cup fresh parsley (chopped)
    • 1 tsp salt
    • ½ tsp black pepper
    • ½ tsp paprika
    • 3 tbsp olive oil (for baking)
    • For the Spinach Alfredo Sauce
    • 2 cups fresh spinach (chopped)
    • 1 cup heavy cream
    • 1 cup grated Parmesan cheese
    • ½ cup milk
    • ¼ tsp nutmeg
    • Salt and pepper (to taste)

    Step 1: Prepare the Meatballs

    1. Preheat your oven to 400°F (200°C).
    2. In a large mixing bowl, combine:
    3. Ground chicken
    4. Ricotta cheese
    5. Egg
    6. Grated Parmesan
    7. Breadcrumbs
    8. Minced garlic
    9. Chopped parsley
    10. Salt, pepper, and paprika
    11. Mix gently with clean hands or a spatula until just combined.
    12. Tip: Don’t overmix, as it will make the meatballs dense.
    13. Form into golf ball-sized meatballs and place on a parchment-lined or greased baking sheet.
    14. Drizzle with olive oil for moisture and golden color.
    15. Bake for 18–20 minutes, or until the meatballs are cooked through and lightly golden.

    Step 2: Make the Creamy Spinach Alfredo Sauce

    1. In a large skillet over medium heat, pour in the heavy cream and milk.
    2. Add nutmeg, a pinch of salt and pepper, and bring to a gentle simmer.
    3. Stir in the grated Parmesan, whisking continuously until melted and smooth.
    4. Add the chopped spinach, stirring until wilted and incorporated into the sauce.
    5. Adjust seasoning with additional salt and pepper to taste.
    6. Pro Tip: Add an extra splash of milk if the sauce becomes too thick.

    Step 3: Combine and Serve

    1. Once the meatballs are done, transfer them into the skillet with the Alfredo sauce.
    2. Gently toss to coat all the meatballs in the creamy spinach sauce.
    3. Serve warm, garnished with extra parsley and a dusting of Parmesan, if desired.

    🍽️ Serving Suggestions
    Serve over buttery garlic mashed potatoes for maximum comfort.

    Try it with buttered herb rice for a Southern-inspired side.

    Pair with a light arugula salad with lemon vinaigrette to balance the richness.

    Don’t forget crusty bread to soak up every last drop of Alfredo goodness!

    🌟 Variations
    1. Spicy Twist
    Add ½ tsp crushed red pepper flakes to the sauce for gentle heat.

    Mix hot sauce into the meatball mixture for an extra kick.

    2. Low-Carb Version
    Replace breadcrumbs with almond flour for a keto-friendly dish.

    3. Cheese Lovers’ Edition
    Add mozzarella cheese into the center of each meatball for a gooey surprise!

    4. Mushroom Alfredo
    Sauté mushrooms and fold into the Alfredo sauce for extra depth.

    5. Gluten-Free Option
    Use gluten-free breadcrumbs, and check labels on Parmesan and other ingredients.

    ❄️ Storage & Reheating
    Storage:
    Store leftovers in an airtight container in the fridge for up to 3 days.

    Freezing:
    Freeze meatballs (without sauce) for up to 2 months.

    Thaw overnight in the refrigerator before reheating.

    Reheating:
    Reheat gently on the stovetop over medium heat.

    Add a splash of milk or cream to loosen the sauce.

    Microwave individual portions in 30-second intervals until heated through.

    🙋‍♀️ 10 Frequently Asked Questions
    1. Can I use ground turkey instead of chicken?
    Yes! Ground turkey is a great alternative and works beautifully with the ricotta and spices.

    2. Can I make the meatballs ahead of time?
    Absolutely. Prepare and refrigerate the meatballs for up to 24 hours before baking.

    3. Can I use frozen spinach?
    Yes, thaw it completely and squeeze out the moisture before adding it to the sauce.

    4. What can I use instead of ricotta?
    You can substitute with cottage cheese, but blend it first for a smoother texture.

    5. Can I double the recipe?
    Yes! Simply double the ingredients to serve a larger crowd—perfect for gatherings.

    6. Is the nutmeg essential?
    Nutmeg adds warmth to the Alfredo sauce, but it’s optional if you prefer to skip.

    7. Can I make this dairy-free?
    Use dairy-free cream, milk, and cheese substitutes, but the flavor will change slightly.

    8. What breadcrumbs are best?
    Use plain or Italian-style breadcrumbs for extra flavor.

    9. Can I add vegetables?
    Definitely! Add sautéed mushrooms, peas, or sun-dried tomatoes to the sauce.

    10. How do I keep the sauce smooth?
    Always stir continuously while adding cheese and heat gently to avoid curdling.

    ✨ Conclusion
    This Southern Style Baked Chicken Ricotta Meatballs with Creamy Spinach Alfredo Sauce is comfort food at its finest. Rich, creamy, and satisfying, it brings together the best of Southern charm and Italian indulgence. Whether you’re making it for a special Sunday dinner, a cozy night in, or to impress guests at a gathering, this dish delivers flavor, nostalgia, and warmth in every bite.

    Serve it with your favorite sides, pour yourself a glass of sweet tea or white wine, and enjoy a meal that feels like a loving hug from the heart of the South. 🍗🥬🧄

  • Fried Chicken Street Corn Tacos with Jalapeño Lime Ranch

    Fried Chicken Street Corn Tacos with Jalapeño Lime Ranch

    Fried Chicken Street Corn Tacos with Jalapeño Lime Ranch – Crispy, Creamy & Flavor-Packed

    Imagine the perfect fusion of Southern-style fried chicken, Mexican street corn, and zesty jalapeño lime ranch—all wrapped up in a warm tortilla. That’s exactly what you get with these Fried Chicken Street Corn Tacos with Jalapeño Lime Ranch. They’re bold, crunchy, creamy, spicy, and packed with layers of flavor that hit every note. With buttermilk-marinated fried chicken tenders, charred sweet corn tossed in a creamy cotija cheese mix, crispy bacon, and a homemade jalapeño lime ranch, these tacos are not just a meal—they’re a flavor explosion. Whether you’re hosting a taco night, tailgating, or simply craving next-level comfort food, this recipe delivers.

    • Meat
    • 1½ lbs chicken tenders
    • 1 strip bacon (cooked and crumbled)
    • Produce
    • 5 ears corn (husked)
    • 1 jalapeño (minced)
    • ½ cup pickled jalapeños (chopped)
    • 2 tbsp pickled jalapeño juice
    • 1 lime (zested and juiced)
    • 1 garlic clove (minced)
    • 1 cup fresh coriander/cilantro (chopped)
    • ⅓ cup scallions (thinly sliced)
    • Condiments
    • 1⅛ cups mayonnaise
    • ¾ cup sour cream
    • 1 cup pickle juice
    • 2 tbsp hot sauce
    • 1 tbsp lime juice
    • Dairy
    • 2¼ cups buttermilk
    • ⅓ cup cotija cheese (grated)
    • Baking & Spices
    • 1½ cups all-purpose flour
    • ¼ cup cornstarch
    • 1 tbsp paprika
    • 1 tbsp ranch seasoning (dry)
    • 2 tsp onion powder
    • 1¼ tbsp powdered garlic
    • 2 tsp black pepper
    • 1 tsp cayenne powder
    • ½ tsp chili powder
    • 2¾ tsp salt
    • Oils & Vinegars
    • Peanut or vegetable oil (for frying)
    • Bread & Baked Goods
    • Flour tortillas (warmed (street taco size preferred))

    Step 1: Marinate the Chicken

    1. In a large bowl, combine:
    2. 2 cups buttermilk
    3. ½ cup pickle juice
    4. 1 tbsp hot sauce
    5. Add chicken tenders, cover, and marinate in the fridge for at least 1 hour (or overnight for best flavor).

    Step 2: Make the Jalapeño Lime Ranch

    1. In a blender or bowl, combine:
    2. ¾ cup sour cream
    3. ½ cup mayonnaise
    4. 2 tbsp pickled jalapeño juice
    5. 1 garlic clove
    6. Juice of 1 lime
    7. 1 tbsp ranch seasoning
    8. Salt and pepper to taste
    9. Blend until smooth or whisk well. Add water to thin if needed. Chill until ready.

    Step 3: Prepare the Street Corn Topping

    1. Grill or char corn on a hot skillet or grill until slightly blackened. Let cool, then cut off the kernels.
    2. In a bowl, mix:
    3. Corn kernels
    4. ⅓ cup mayonnaise
    5. 2 tbsp hot sauce
    6. ⅓ cup cotija cheese
    7. ½ cup chopped pickled jalapeños
    8. 1 tbsp lime juice
    9. 1 tsp lime zest
    10. ½ tsp each of chili powder and salt
    11. Chopped scallions and cilantro (reserve some for garnish)

    Step 4: Dredge & Fry the Chicken

    1. In a shallow bowl, mix:
    2. 1½ cups flour
    3. ¼ cup cornstarch
    4. 1 tbsp paprika
    5. 1¼ tbsp powdered garlic
    6. 2 tsp onion powder
    7. 1 tsp cayenne
    8. 2 tsp black pepper
    9. 1¾ tsp salt
    10. Remove chicken from marinade and dredge in the flour mixture. Let rest 5 minutes.
    11. Heat oil in a deep skillet to 350°F (175°C).
    12. Fry chicken in batches 4–5 minutes per side, until golden and cooked through.
    13. Drain on a paper towel-lined plate.

    Step 5: Assemble the Tacos

    1. Warm the flour tortillas.
    2. Slice or keep chicken tenders whole.
    3. Add to tortilla base, then top with:
    4. Street corn mix
    5. Drizzle of jalapeño lime ranch
    6. Crumbled bacon
    7. More cotija, cilantro, and scallions

    🌮 Variations
    1. Air Fryer Version
    Air fry chicken tenders at 400°F for 10–12 mins, flipping halfway.

    2. Vegetarian Option
    Swap chicken with fried cauliflower or crispy tofu.

    3. Spice It Up
    Add extra hot sauce or fresh jalapeños to the ranch.

    4. Make It a Bowl
    Serve over rice or greens instead of tortillas for a taco bowl.

    ❄️ Storage & Reheating
    Storage:
    Keep chicken, corn, and sauces separate in airtight containers for up to 3 days.

    Reheating:
    Reheat chicken in an oven or air fryer for crispy texture.

    Microwave for 30–60 seconds for a quicker option (will be softer).

    🙋‍♀️ 10 Frequently Asked Questions
    1. Can I use frozen corn?
    Yes! Just thaw and sauté in a pan until charred.

    2. Is pickled jalapeño juice spicy?
    It adds a zesty kick but isn’t overpowering—adjust to your taste.

    3. Can I use chicken thighs?
    Absolutely. Boneless thighs work great—just adjust cook time slightly.

    4. What kind of tortillas work best?
    Flour tortillas hold up best to the fillings, but corn works too for a street taco vibe.

    5. Can I grill the chicken instead of frying?
    Yes, grill marinated chicken for a healthier twist.

    6. What does the cornstarch do in the breading?
    It adds extra crispiness to the fried chicken.

    7. Can I prep this in advance?
    Yes! Marinate the chicken and prep the toppings the day before.

    8. Can I freeze the cooked chicken?
    Yes—freeze fried tenders in a single layer, then store in a bag for up to 2 months.

    9. What can I use instead of cotija cheese?
    Try feta or grated Parmesan for a similar salty kick.

    10. What drink pairs best?
    Try spicy margaritas, Mexican lager, or lime agua fresca.

    🎉 Conclusion
    These Fried Chicken Street Corn Tacos with Jalapeño Lime Ranch are the definition of bold, indulgent, and completely crave-worthy. Crispy fried chicken meets creamy, tangy street corn and a punchy ranch drizzle—all tucked into a soft tortilla. It’s comfort food meets taco night, and once you try it, you’ll be hooked.

    Serve these at your next party or make them your new weeknight favorite—you’ll never look at tacos the same again. 🌮🔥🧄

  • Korean BBQ Meatballs with Spicy Mayo Dip – Sweet, Savory, and Addictively Delicious

    Korean BBQ Meatballs with Spicy Mayo Dip – Sweet, Savory, and Addictively Delicious

    Korean BBQ Meatballs with Spicy Mayo Dip – Sweet, Savory, and Addictively Delicious

    Looking for a showstopping appetizer or flavorful dinner that brings the bold flavors of Korean BBQ into bite-sized form? These Korean BBQ Meatballs are tender, juicy, and packed with umami from soy sauce, sesame oil, ginger, and garlic. Tossed in a sticky-sweet glaze and served with a creamy, fiery spicy mayo dip, they’re impossible to resist. Perfect for game day, party platters, or even meal prep, this recipe offers the ideal balance of sweet, savory, and spicy in every bite. Pair them with rice, noodles, or skewer them for a fun party dish—they’re always a hit.

    • For the Meatballs
    • 1 lb ground beef
    • 2 cloves garlic (minced)
    • 1- inch piece ginger (grated)
    • 3 green onions (finely chopped)
    • 1 egg
    • ½ cup panko breadcrumbs
    • ½ teaspoon salt
    • ¼ teaspoon black pepper
    • 1 tablespoon soy sauce
    • 1 tablespoon sesame oil
    • For the Korean BBQ Glaze
    • 5 tablespoons soy sauce
    • 1 tablespoon brown sugar
    • 2 tablespoons honey (or substitute with more brown sugar)
    • 1 tablespoon rice vinegar
    • 1 teaspoon garlic (grated or finely minced)
    • 1 teaspoon ginger (grated)
    • 1 teaspoon cornstarch (mixed with 1 tablespoon water (slurry))
    • 1 tablespoon sesame oil
    • 1 teaspoon chili paste (optional, for heat)
    • Sesame seeds (for garnish)
    • Chopped green onion (for garnish)
    • For the Spicy Mayo Dip
    • ½ cup mayonnaise
    • 3 tablespoons chili paste (like gochujang or sriracha)
    • 1 tablespoon lime juice
    • 1 teaspoon honey
    • Pinch of garlic powder and salt

    Step 1: Make the Meatballs

    1. Preheat oven to 400°F (200°C). Line a baking sheet with parchment paper.
    2. In a large bowl, combine:
    3. Ground beef
    4. Garlic
    5. Ginger
    6. Green onions
    7. Egg
    8. Panko breadcrumbs
    9. Soy sauce
    10. Sesame oil
    11. Salt and pepper
    12. Mix gently until just combined—avoid overmixing.
    13. Roll into 1 to 1½-inch balls and place on the baking sheet.
    14. Bake for 15–18 minutes, until cooked through and golden brown.

    Step 2: Make the Korean BBQ Glaze

    1. In a saucepan over medium heat, add:
    2. Soy sauce
    3. Brown sugar
    4. Honey
    5. Rice vinegar
    6. Garlic
    7. Ginger
    8. Sesame oil
    9. Chili paste (if using)
    10. Bring to a simmer.
    11. Stir in the cornstarch slurry and cook until thickened, about 2–3 minutes.
    12. Set aside.

    Step 3: Make the Spicy Mayo Dip

    1. In a small bowl, whisk together:
    2. Mayonnaise
    3. Chili paste
    4. Lime juice
    5. Honey
    6. Garlic powder and salt
    7. Taste and adjust spice or sweetness as desired.
    8. Chill until ready to serve.

    Step 4: Glaze & Serve

    1. Once meatballs are done, toss them in the warm Korean BBQ glaze until evenly coated.
    2. Sprinkle with sesame seeds and chopped green onions.
    3. Serve warm with the spicy mayo dip on the side or drizzled over the top.

    Variations
    1. Ground Chicken or Turkey
    Swap beef for a lighter version—just reduce bake time slightly.

    2. Sweet & Spicy Skewers
    Thread glazed meatballs onto skewers with grilled pineapple or bell peppers.

    3. Rice Bowl
    Serve over rice with cucumber slices, kimchi, and a drizzle of spicy mayo for a hearty meal.

    4. Vegan Option
    Use plant-based ground meat, vegan mayo, and skip honey or use agave.

    Storage & Reheating
    Storage:
    Store meatballs and glaze separately in the fridge for up to 4 days.

    Freezing:
    Freeze meatballs (uncooked or cooked) for up to 2 months. Thaw and glaze before serving.

    Reheating:
    Reheat in the oven at 350°F for 10 minutes or microwave in short intervals. Toss in glaze just before serving.

    10 Frequently Asked Questions
    1. Can I make the meatballs ahead of time?
    Yes! Mix and shape the meatballs a day ahead and refrigerate until ready to bake.

    2. Is there a gluten-free option?
    Use GF soy sauce (tamari) and gluten-free breadcrumbs.

    3. Can I pan-fry instead of bake?
    Yes, pan-fry in a bit of oil over medium heat for about 8–10 minutes, turning occasionally.

    4. What chili paste is best?
    Gochujang is traditional and adds a sweet-heat depth, but sriracha works great too.

    5. Can I make this less spicy?
    Yes—use less chili paste or omit it from the dip and glaze.

    6. Can I double the recipe for a crowd?
    Absolutely! Easily double both the meatballs and sauce.

    7. Are these good for meal prep?
    Yes! Keep the sauce separate until reheating for best texture.

    8. What’s the best dipping sauce alternative?
    Try soy-lime dipping sauce or garlic yogurt sauce for variety.

    9. What sides go well with this?
    Steamed jasmine rice

    Pickled veggies or kimchi

    Asian slaw or cucumber salad

    10. Can I bake them on foil instead of parchment?
    Yes, just lightly grease the foil to prevent sticking.

    Conclusion
    These Korean BBQ Meatballs with Spicy Mayo Dip are everything you want in a modern appetizer or flavorful dinner: bold, sweet-savory glaze, juicy texture, and a creamy, spicy kick from the dipping sauce. Whether you serve them as part of a Korean-inspired spread or bring them to a party, these meatballs are guaranteed to steal the show