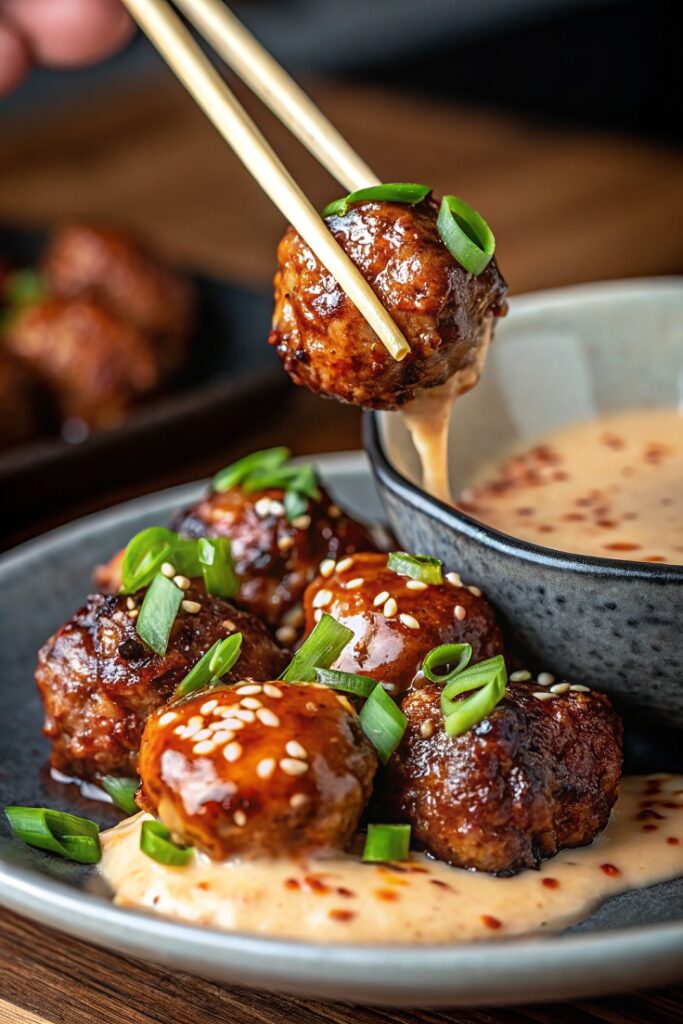
Korean BBQ Meatballs with Spicy Mayo Dip – Sweet, Savory, and Addictively Delicious

Looking for a showstopping appetizer or flavorful dinner that brings the bold flavors of Korean BBQ into bite-sized form? These Korean BBQ Meatballs are tender, juicy, and packed with umami from soy sauce, sesame oil, ginger, and garlic. Tossed in a sticky-sweet glaze and served with a creamy, fiery spicy mayo dip, they’re impossible to resist. Perfect for game day, party platters, or even meal prep, this recipe offers the ideal balance of sweet, savory, and spicy in every bite. Pair them with rice, noodles, or skewer them for a fun party dish—they’re always a hit.
- For the Meatballs
- 1 lb ground beef
- 2 cloves garlic (minced)
- 1- inch piece ginger (grated)
- 3 green onions (finely chopped)
- 1 egg
- ½ cup panko breadcrumbs
- ½ teaspoon salt
- ¼ teaspoon black pepper
- 1 tablespoon soy sauce
- 1 tablespoon sesame oil
- For the Korean BBQ Glaze
- 5 tablespoons soy sauce
- 1 tablespoon brown sugar
- 2 tablespoons honey (or substitute with more brown sugar)
- 1 tablespoon rice vinegar
- 1 teaspoon garlic (grated or finely minced)
- 1 teaspoon ginger (grated)
- 1 teaspoon cornstarch (mixed with 1 tablespoon water (slurry))
- 1 tablespoon sesame oil
- 1 teaspoon chili paste (optional, for heat)
- Sesame seeds (for garnish)
- Chopped green onion (for garnish)
- For the Spicy Mayo Dip
- ½ cup mayonnaise
- 3 tablespoons chili paste (like gochujang or sriracha)
- 1 tablespoon lime juice
- 1 teaspoon honey
- Pinch of garlic powder and salt
Step 1: Make the Meatballs
- Preheat oven to 400°F (200°C). Line a baking sheet with parchment paper.
- In a large bowl, combine:
- Ground beef
- Garlic
- Ginger
- Green onions
- Egg
- Panko breadcrumbs
- Soy sauce
- Sesame oil
- Salt and pepper
- Mix gently until just combined—avoid overmixing.
- Roll into 1 to 1½-inch balls and place on the baking sheet.
- Bake for 15–18 minutes, until cooked through and golden brown.
Step 2: Make the Korean BBQ Glaze
- In a saucepan over medium heat, add:
- Soy sauce
- Brown sugar
- Honey
- Rice vinegar
- Garlic
- Ginger
- Sesame oil
- Chili paste (if using)
- Bring to a simmer.
- Stir in the cornstarch slurry and cook until thickened, about 2–3 minutes.
- Set aside.
Step 3: Make the Spicy Mayo Dip
- In a small bowl, whisk together:
- Mayonnaise
- Chili paste
- Lime juice
- Honey
- Garlic powder and salt
- Taste and adjust spice or sweetness as desired.
- Chill until ready to serve.
Step 4: Glaze & Serve
- Once meatballs are done, toss them in the warm Korean BBQ glaze until evenly coated.
- Sprinkle with sesame seeds and chopped green onions.
- Serve warm with the spicy mayo dip on the side or drizzled over the top.
Variations
1. Ground Chicken or Turkey
Swap beef for a lighter version—just reduce bake time slightly.
2. Sweet & Spicy Skewers
Thread glazed meatballs onto skewers with grilled pineapple or bell peppers.
3. Rice Bowl
Serve over rice with cucumber slices, kimchi, and a drizzle of spicy mayo for a hearty meal.
4. Vegan Option
Use plant-based ground meat, vegan mayo, and skip honey or use agave.
Storage & Reheating
Storage:
Store meatballs and glaze separately in the fridge for up to 4 days.
Freezing:
Freeze meatballs (uncooked or cooked) for up to 2 months. Thaw and glaze before serving.
Reheating:
Reheat in the oven at 350°F for 10 minutes or microwave in short intervals. Toss in glaze just before serving.
10 Frequently Asked Questions
1. Can I make the meatballs ahead of time?
Yes! Mix and shape the meatballs a day ahead and refrigerate until ready to bake.
2. Is there a gluten-free option?
Use GF soy sauce (tamari) and gluten-free breadcrumbs.
3. Can I pan-fry instead of bake?
Yes, pan-fry in a bit of oil over medium heat for about 8–10 minutes, turning occasionally.
4. What chili paste is best?
Gochujang is traditional and adds a sweet-heat depth, but sriracha works great too.
5. Can I make this less spicy?
Yes—use less chili paste or omit it from the dip and glaze.
6. Can I double the recipe for a crowd?
Absolutely! Easily double both the meatballs and sauce.
7. Are these good for meal prep?
Yes! Keep the sauce separate until reheating for best texture.
8. What’s the best dipping sauce alternative?
Try soy-lime dipping sauce or garlic yogurt sauce for variety.
9. What sides go well with this?
Steamed jasmine rice
Pickled veggies or kimchi
Asian slaw or cucumber salad
10. Can I bake them on foil instead of parchment?
Yes, just lightly grease the foil to prevent sticking.
Conclusion
These Korean BBQ Meatballs with Spicy Mayo Dip are everything you want in a modern appetizer or flavorful dinner: bold, sweet-savory glaze, juicy texture, and a creamy, spicy kick from the dipping sauce. Whether you serve them as part of a Korean-inspired spread or bring them to a party, these meatballs are guaranteed to steal the show