Blog

  • Pistachio Raspberry Cake – Elegant, Nutty, and Delightfully Fruity!

    Pistachio Raspberry Cake – Elegant, Nutty, and Delightfully Fruity!

    Pistachio Raspberry Cake – Elegant, Nutty, and Delightfully Fruity!

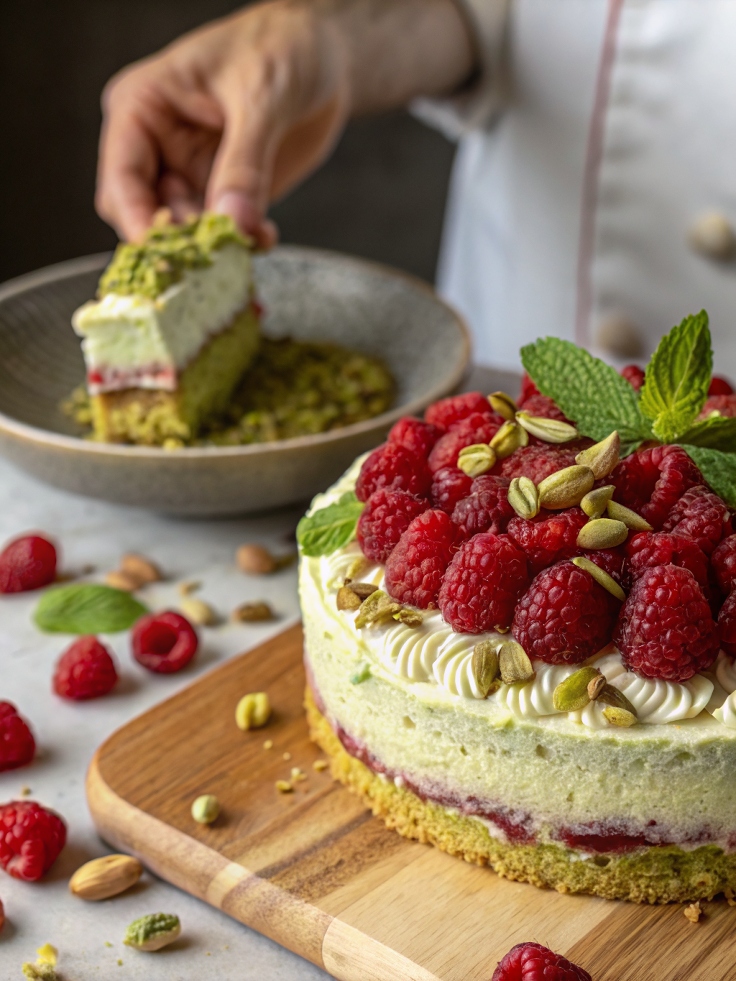
    Meet your new showstopper: Pistachio Raspberry Cake. 💚🍓 This stunning cake is the perfect blend of earthy pistachio flavor and sweet-tart raspberries, wrapped in a moist, buttery crumb. It’s not only delicious, but it’s also gorgeous — with a naturally green hue from pistachios and pops of bright red berries throughout, every slice looks like a work of art. Perfect for birthdays, weddings, tea parties, or any special occasion where you want to impress, this cake balances richness and freshness beautifully. Plus, you’ll love the texture: finely ground pistachios add a slight crunch while keeping the cake incredibly tender. If you enjoy nutty and fruity desserts, you’ll also love this Almond Raspberry Cake or the iconic Lemon Pistachio Loaf. Let’s bake a masterpiece!

    • For the Cake:
    • 1 1/2 cups shelled pistachios (unsalted)
    • 2 cups all-purpose flour
    • 2 teaspoons baking powder
    • 1/2 teaspoon baking soda
    • 1/2 teaspoon salt
    • 1 cup unsalted butter (room temperature)
    • 1 1/2 cups granulated sugar
    • 4 large eggs
    • 2 teaspoons vanilla extract
    • 1 teaspoon almond extract (optional, enhances nuttiness)
    • 3/4 cup buttermilk
    • 1 cup fresh raspberries (plus extra for garnish)
    • For the Frosting:
    • 8 oz cream cheese (softened)
    • 1/2 cup unsalted butter (softened)
    • 3 cups powdered sugar
    • 1 teaspoon vanilla extract
    • 1 –2 tablespoons milk (to desired consistency)
    • Optional Decoration:
    • Chopped pistachios
    • Fresh raspberries
    • Edible flowers or mint leaves

    Step 1: Prepare the Pistachios

    1. Preheat your oven to 350°F (175°C).
    2. Spread pistachios on a baking sheet and toast for 5–7 minutes until fragrant.
    3. Cool slightly, then pulse in a food processor until finely ground. Be careful not to over-process into a paste.
    4. Pro Tip: Reserve 2–3 tablespoons of the ground pistachios for decoration later!

    Step 2: Mix Dry Ingredients

    1. In a large bowl, whisk together:
    2. Flour
    3. Baking powder
    4. Baking soda
    5. Salt
    6. Ground pistachios

    Step 3: Cream Butter and Sugar

    1. In a stand mixer, beat the butter and sugar on medium-high speed until light and fluffy, about 3–4 minutes.

    Step 4: Add Eggs and Flavorings

    1. Beat in the eggs, one at a time, scraping down the bowl as needed.
    2. Mix in the vanilla extract and almond extract (if using).

    Step 5: Combine Wet and Dry Ingredients

    1. Add the dry ingredients to the wet mixture in three additions, alternating with the buttermilk, beginning and ending with the dry ingredients.
    2. Mix until just combined — don’t overmix!

    Step 6: Fold in Raspberries

    1. Gently fold the raspberries into the batter using a spatula, being careful not to crush them.

    Step 7: Bake

    1. Divide the batter evenly between two greased and parchment-lined 8-inch round cake pans.
    2. Bake for 25–30 minutes, or until a toothpick inserted in the center comes out clean.
    3. Cool the cakes in the pans for 10 minutes, then transfer to a wire rack to cool completely.

    Step 8: Make the Frosting

    1. In a mixing bowl, beat together:
    2. Cream cheese
    3. Butter
    4. Beat until smooth, about 2 minutes.
    5. Gradually add the powdered sugar, mixing on low speed until incorporated.
    6. Add vanilla extract and milk as needed to reach a spreadable consistency.

    Step 9: Assemble the Cake

    1. Place one cake layer on a serving plate.
    2. Spread a generous layer of frosting over the top.
    3. Place the second cake layer on top and frost the top and sides of the cake.

    Step 10: Decorate!

    1. Sprinkle reserved ground pistachios along the edges.
    2. Garnish with fresh raspberries, mint leaves, and optional edible flowers.
    3. Chill for 30 minutes before slicing for cleaner cuts.

    Variations
    Make this Pistachio Raspberry Cake your own with these fun twists!

    1. Lemon Raspberry Pistachio Cake
    Add 1 tablespoon lemon zest to the batter and frosting for a bright citrus kick.

    2. Chocolate Pistachio Cake
    Fold 1/2 cup mini chocolate chips into the batter for extra indulgence.

    3. Vegan Option
    Use vegan butter, plant-based milk with vinegar for buttermilk, and egg substitutes like flax eggs.

    4. Gluten-Free Version
    Substitute a 1:1 gluten-free baking flour to keep the cake gluten-free.

    5. Sheet Cake Version
    Bake in a 9×13 inch pan for about 35–40 minutes for a casual, single-layer option.

    6. Raspberry Filling
    Spread raspberry jam between the layers for even more berry flavor!

    Storage and Reheating
    Storage:
    Store covered in the refrigerator for up to 4 days.

    Bring to room temperature before serving for the best flavor.

    Freezing:
    Freeze unfrosted cake layers for up to 2 months.

    Thaw overnight in the refrigerator before frosting and decorating.

    Reheating:
    No need to reheat! Serve at room temperature for the perfect texture and flavor.

    Pro Tip: Add fresh raspberries after thawing for the best presentation.

    10 Frequently Asked Questions (FAQs)
    1. Can I use frozen raspberries?
    Yes! Add them to the batter straight from the freezer to prevent bleeding.

    2. Can I make this cake ahead of time?
    Absolutely! Bake the cake layers a day in advance and frost before serving.

    3. What’s the best substitute for buttermilk?
    Use milk + 1 tablespoon vinegar or lemon juice. Let it sit for 5 minutes.

    4. Can I use pistachio flour instead of grinding my own?
    Yes! Use 1 1/2 cups pistachio flour in place of ground pistachios.

    5. Is the almond extract necessary?
    No, but it enhances the nutty flavor beautifully.

    6. Can I make this as cupcakes?
    Yes! Bake in cupcake liners for 18–22 minutes, or until a toothpick comes out clean.

    7. How do I prevent the raspberries from sinking?
    Toss them lightly in flour before folding them into the batter.

    8. Can I use cream cheese frosting alternatives?
    Of course! Try a Swiss meringue buttercream or whipped cream frosting.

    9. What pairs well with this cake?
    Serve with tea, Prosecco, or a light raspberry coulis on the side.

    10. Is this cake overly sweet?
    No — the tangy raspberries and creamy frosting balance the sweetness perfectly!

    Conclusion
    This Pistachio Raspberry Cake is a celebration of flavor, texture, and beauty. 💚🍓

    The nutty richness of pistachios, the bright pops of raspberry, and the silky cream cheese frosting come together in a cake that’s as stunning as it is scrumptious. Whether you’re marking a special occasion or simply treating yourself, this cake is guaranteed to impress.

    For more stunning desserts, check out:

    Strawberry Shortcake Cake

    Lemon Poppy Seed Cake

    Vanilla Bean Layer Cake

    Happy baking!

  • Oreo Dirt Cake Recipe – The Ultimate No-Bake Dessert Delight!

    Oreo Dirt Cake Recipe – The Ultimate No-Bake Dessert Delight!

    Oreo Dirt Cake Recipe – The Ultimate No-Bake Dessert Delight!

    Looking for the perfect crowd-pleasing dessert that’s fun, nostalgic, and irresistibly creamy? Meet the Oreo Dirt Cake, a no-bake masterpiece that layers crushed Oreo cookies with a silky smooth cream cheese-pudding filling. 🍫✨ This dessert isn’t just visually playful — with its crumbly “dirt” topping and hidden creamy layers, it’s a spoonful of happiness in every bite. Whether you’re making it for a birthday party, family gathering, summer barbecue, or just to treat yourself, Oreo Dirt Cake never fails to delight. If you enjoy easy, no-bake desserts like this, you’ll also love No-Bake Cheesecake or this simple and fun Chocolate Lasagna. Get ready — this is the dessert everyone will ask you for!

    • Crust & Topping:
    • 1 family-size package Oreo cookies (about 36 cookies, crushed)
    • Creamy Filling:
    • 1 8 oz package cream cheese, softened
    • 1/2 cup butter (softened)
    • 1 cup powdered sugar
    • 1 5.1 oz package instant vanilla pudding mix
    • 3 cups cold milk
    • 1 12 oz container frozen whipped topping (Cool Whip), thawed
    • 1 teaspoon vanilla extract
    • Optional Decorations:
    • Gummy worms (for a fun, garden-themed effect!)
    • Fresh mint leaves
    • Crushed chocolate rocks or candy pebbles

    Step 1: Prepare the “Dirt”

    1. Place the Oreo cookies in a food processor and pulse until they resemble coarse crumbs.
    2. Set aside about 1 cup of crumbs for the topping.
    3. Pro Tip: No food processor? Place cookies in a zip-top bag and crush with a rolling pin!

    Step 2: Make the Cream Cheese Mixture

    1. In a large mixing bowl, beat together:
    2. Softened cream cheese
    3. Softened butter
    4. Powdered sugar
    5. Beat until light and fluffy, about 2–3 minutes.

    Step 3: Prepare the Pudding Mixture

    1. In a separate bowl, whisk together:
    2. Vanilla pudding mix
    3. Cold milk
    4. Whisk for about 2 minutes, until it thickens.

    Step 4: Combine the Mixtures

    1. Fold the pudding mixture into the cream cheese mixture until smooth.
    2. Gently fold in the whipped topping and vanilla extract.
    3. Mix until no streaks remain — creamy and fluffy!

    Step 5: Assemble the Dirt Cake

    1. In a 9×13 inch pan (or individual cups for parfaits), layer:
    2. Half the Oreo crumbs at the bottom.
    3. Spread all of the creamy filling over the crumbs.
    4. Sprinkle with the remaining Oreo crumbs to cover completely.

    Step 6: Chill

    1. Cover and refrigerate for at least 4 hours, or overnight for best results.

    Step 7: Decorate & Serve!

    1. Just before serving, decorate with gummy worms, mint leaves, or candy rocks for extra fun!
    2. Serve chilled, and enjoy every creamy, chocolatey spoonful.

    Variations
    Want to make your Oreo Dirt Cake even more exciting? Try these twists!

    1. Chocolate Lovers’ Dirt Cake
    Use chocolate pudding instead of vanilla for double chocolate goodness.

    2. Peanut Butter Version
    Add 1/2 cup creamy peanut butter to the cream cheese mixture for a nutty twist.

    3. Mint Chocolate
    Add 1/2 teaspoon peppermint extract to the cream filling and top with crushed mint Oreos.

    4. Layered Parfaits
    Assemble individual dirt cakes in mason jars or dessert cups for party-friendly servings.

    5. Halloween Theme
    Add Halloween-themed gummy candies, candy eyeballs, and orange/black sprinkles!

    6. Gluten-Free
    Use gluten-free sandwich cookies to make this dessert gluten-free.

    Storage and Reheating
    Storage:
    Store covered in the refrigerator for up to 5 days.

    Keep chilled until ready to serve to maintain the creamy texture.

    Freezing:
    Freeze for up to 1 month.

    Thaw overnight in the refrigerator before serving.

    Reheating:
    No need to reheat — this dessert is best served chilled!

    Pro Tip: Add fresh gummy worms or toppings after thawing for best appearance.

    10 Frequently Asked Questions (FAQs)
    1. Can I make Oreo Dirt Cake ahead of time?
    Yes! Make it up to 24 hours in advance for the best flavor and texture.

    2. Can I use homemade whipped cream?
    Absolutely! Use 3 cups whipped cream, but ensure it’s stabilized to hold up in the fridge.

    3. Can I add fresh fruit?
    Yes! Sliced strawberries or raspberries make a great addition.

    4. What if I don’t have a food processor?
    No problem! Crush the cookies in a zip-top bag with a rolling pin.

    5. Can I make this recipe in individual cups?
    Definitely! It’s a fun way to serve at parties or gatherings.

    6. Can I use different flavored Oreos?
    Yes! Try Golden Oreos, Peanut Butter Oreos, or Mint Oreos for variety.

    7. Does this dessert contain raw eggs?
    Nope! It’s a completely egg-free, no-bake dessert.

    8. Can I skip the cream cheese?
    The cream cheese adds richness, but you can substitute with an extra cup of whipped topping for a lighter version.

    9. How long does it need to chill?
    At least 4 hours, but overnight is best for full flavor and set texture.

    10. Is Oreo Dirt Cake freezer-friendly?
    Yes! Freeze it for up to 1 month, and thaw overnight in the fridge before serving.

    Conclusion
    There you have it — your new go-to, no-bake dessert: the Oreo Dirt Cake! 🍫🌱

    With its rich layers of crushed Oreos and creamy pudding filling, this dessert is as fun to make as it is to eat. Whether you serve it in a big dish for a party or portion it out in cute jars for individual treats, it’s a guaranteed crowd-pleaser. And the best part? It’s endlessly customizable with fun toppings and flavor twists!

    If you loved this recipe, don’t miss out on these other fun treats:

    Chocolate Lasagna

    No-Bake Cheesecake

    Funfetti Icebox Cake

    Go on, dig in — dessert happiness awaits! 🎉

  • Creamy Herb Chicken & Basmati Rice – A Comforting, Flavor-Packed One-Pan Meal

    Creamy Herb Chicken & Basmati Rice – A Comforting, Flavor-Packed One-Pan Meal

    Creamy Herb Chicken & Basmati Rice – A Comforting, Flavor-Packed One-Pan Meal

    Nothing beats the ease and comfort of a one-pan meal, especially when it’s as flavorful and satisfying as this Creamy Herb Chicken & Basmati Rice! 🍗🍚🌿 Picture this: tender, juicy chicken breasts seared to golden perfection, nestled into a bed of fragrant basmati rice, all coated in a luscious, creamy herb sauce. Fresh thyme, parsley, and a hint of garlic infuse every bite with cozy, aromatic flavor. The best part? Everything cooks together in one pan, meaning minimal cleanup and maximum flavor. Whether you’re feeding your family on a busy weeknight or looking for a comforting weekend dinner, this dish is a total crowd-pleaser. Plus, it’s versatile — you can swap the herbs, add veggies, or make it even creamier with your favorite cheese. If you love comforting skillet meals, be sure to check out this Creamy Tuscan Chicken or the ever-popular One-Pot Chicken Alfredo. Let’s get cooking!

    • Protein:
    • 4 boneless (skinless chicken breasts)
    • Salt and pepper (to taste)
    • 2 tablespoons olive oil (for searing)
    • Rice:
    • 1 cup basmati rice (rinsed and drained)
    • 2 1/4 cups chicken broth (low sodium)
    • Creamy Herb Sauce:
    • 1 tablespoon butter
    • 3 cloves garlic (minced)
    • 1 teaspoon onion powder
    • 1 teaspoon dried thyme (or 1 tablespoon fresh thyme leaves)
    • 1 teaspoon dried parsley (or 1 tablespoon fresh parsley, chopped)
    • 1/2 teaspoon dried basil
    • 1/2 teaspoon crushed red pepper flakes (optional, for a gentle heat)
    • 1 cup heavy cream
    • 1/2 cup Parmesan cheese (grated)
    • Salt and pepper (to taste)
    • Garnish (Optional but recommended!:)
    • Fresh parsley or thyme
    • Lemon wedges for serving
    • Extra grated Parmesan

    Step 1: Season and Sear the Chicken

    1. Pat the chicken breasts dry with paper towels.
    2. Season both sides generously with salt and pepper.
    3. Heat olive oil in a large, deep skillet or sauté pan over medium-high heat.
    4. Sear the chicken for 4–5 minutes per side, until golden brown but not fully cooked through.
    5. Remove chicken from the pan and set aside.

    Step 2: Sauté the Aromatics

    1. In the same pan, reduce heat to medium.
    2. Add butter and melt.
    3. Stir in minced garlic and cook for 1 minute until fragrant.
    4. Add onion powder, thyme, parsley, basil, and crushed red pepper flakes.
    5. Cook for another 30 seconds to toast the spices.

    Step 3: Add Rice and Broth

    1. Pour in the basmati rice, stirring to coat in the buttery herb mixture.
    2. Add chicken broth and bring to a simmer.

    Step 4: Nestle the Chicken Back In

    1. Place the seared chicken breasts on top of the rice mixture.
    2. Cover the pan with a lid and reduce heat to low.
    3. Cook for 18–20 minutes, or until the rice is tender and the chicken reaches an internal temperature of 165°F (74°C).

    Step 5: Make It Creamy

    1. Remove the lid and reduce the heat to low.
    2. Pour in the heavy cream and sprinkle with Parmesan cheese.
    3. Gently stir the sauce around the chicken and rice until smooth and creamy.
    4. Season with additional salt and pepper, to taste.

    Step 6: Serve and Garnish

    1. Garnish with fresh herbs, a squeeze of lemon juice, and extra Parmesan cheese if desired.
    2. Serve hot and enjoy the cozy, creamy flavors!

    Variations
    Want to give your Creamy Herb Chicken & Basmati Rice a personal twist? Try these creative ideas!

    1. Add Vegetables
    Stir in baby spinach, peas, or asparagus tips during the last 5 minutes of cooking for a veggie boost.

    2. Cheesy Upgrade
    Add 1/2 cup shredded mozzarella for extra cheesy goodness.

    3. Make It Spicier
    Increase red pepper flakes or add a dash of hot sauce to the cream sauce.

    4. Lemon Herb Twist
    Add 1 tablespoon lemon juice and zest for brightness.

    5. Herb Swap
    Use fresh rosemary or tarragon for a different herb profile.

    6. Dairy-Free Version
    Substitute coconut cream for the heavy cream and use nutritional yeast instead of Parmesan.

    Storage and Reheating
    Storage:
    Store leftovers in an airtight container in the refrigerator for up to 4 days.

    Freezing:
    Freeze in a freezer-safe container for up to 2 months.

    Thaw overnight in the fridge before reheating.

    Reheating:
    Reheat gently in a skillet over low heat, adding a splash of broth or cream to loosen the sauce.

    Microwave individual portions in 30-second intervals, stirring in between.

    Pro Tip: Garnish with fresh herbs after reheating to revive flavor!

    10 Frequently Asked Questions (FAQs)
    1. Can I use chicken thighs instead of breasts?
    Yes! Chicken thighs work beautifully and stay juicy in this recipe.

    2. Can I use a different type of rice?
    Yes — jasmine or long-grain white rice works well. Adjust the liquid ratio as needed.

    3. Can I make this dish ahead of time?
    Absolutely! Prepare the dish, cool completely, and store in the refrigerator. Reheat before serving.

    4. How do I know when the chicken is fully cooked?
    Use a thermometer to ensure the internal temperature reaches 165°F (74°C).

    5. Can I use milk instead of heavy cream?
    Yes, but the sauce will be thinner. For richness, add 1 tablespoon butter along with the milk.

    6. What can I serve with this dish?
    A simple green salad or garlic bread complements it beautifully.

    7. Can I make this vegetarian?
    Yes! Skip the chicken and use vegetable broth. Add hearty veggies like mushrooms or chickpeas.

    8. Can I use pre-cooked rice?
    It’s best to cook the rice in the sauce for maximum flavor, but if using pre-cooked rice, reduce broth and cooking time.

    9. Is this recipe freezer-friendly?
    Yes! Cool completely, then freeze in airtight containers.

    10. Can I add wine to the sauce?
    Absolutely! Add 1/4 cup dry white wine when sautéing the garlic for depth of flavor.

    Conclusion
    There’s nothing quite like a cozy, creamy one-pan meal to bring comfort to your dinner table, and this Creamy Herb Chicken & Basmati Rice delivers every time. 🍗🍚🌿

    With tender, juicy chicken, perfectly fluffy rice, and a rich, herbaceous cream sauce, this dish feels special yet is incredibly easy to make. Plus, it’s versatile — customize it with your favorite herbs, veggies, or cheeses to make it your own.

    Whether you’re cooking for your family, meal-prepping for the week, or impressing dinner guests, this recipe is sure to become a regular in your kitchen.

    For more comforting meals, try this One-Pot Lemon Garlic Pasta or this Creamy Mushroom Chicken.

    Enjoy every creamy, comforting bite!

  • Raspberry Cinnamon Rolls – Sweet, Tangy, and Irresistibly Soft!

    Raspberry Cinnamon Rolls – Sweet, Tangy, and Irresistibly Soft!

    Raspberry Cinnamon Rolls – Sweet, Tangy, and Irresistibly Soft!

    What’s better than the warm aroma of freshly baked cinnamon rolls wafting through your kitchen? Raspberry Cinnamon Rolls — that’s what! 🍓✨ These soft, fluffy rolls take the classic cinnamon roll and give it a fruity, tangy twist with bursts of fresh raspberries and a hint of bright lemon zest. The sweet-tart raspberries balance perfectly with the warm cinnamon filling and the pillowy, buttery dough. Finish it all off with a drizzle of vanilla-lemon glaze, and you’ve got a bakery-worthy treat that’s perfect for breakfast, brunch, or a sweet snack any time of day. If you love homemade rolls, you’ll also enjoy this Classic Cinnamon Roll Recipe or for another fruity twist, try these Strawberry Sweet Rolls. Ready to make your kitchen smell amazing? Let’s get baking!

    • Dough:
    • 4 cups all-purpose flour
    • 2 teaspoons instant yeast
    • 1/2 teaspoon salt
    • 3/4 cup granulated sugar
    • 2 large eggs
    • 1 1/4 cups milk (warm)
    • 5/16 cup unsalted butter (melted (about 5 tablespoons))
    • 1 tablespoon vegetable oil
    • Filling:
    • 1 cup fresh raspberries
    • 2 teaspoons ground cinnamon
    • Zest of 1 lemon
    • 1 tablespoon lemon juice (fresh)
    • 1/4 cup granulated sugar
    • Glaze:
    • 1 cup powdered sugar
    • 1/2 teaspoon vanilla extract
    • 1 –2 tablespoons lemon juice (to desired consistency)
    • Optional Garnish:
    • Extra lemon zest
    • Fresh raspberries
    • Dusting of powdered sugar

    Step 1: Prepare the Dough

    1. In a large mixing bowl, combine:
    2. Warm milk (about 110°F / 43°C)
    3. Instant yeast
    4. Sugar
    5. Melted butter
    6. Eggs
    7. Vegetable oil
    8. Whisk until smooth.
    9. Gradually add flour and salt, mixing until a sticky dough forms.
    10. Knead the dough by hand or using a stand mixer with the dough hook attachment for 6–8 minutes, until smooth and elastic.

    Step 2: Let the Dough Rise

    1. Place the dough in a lightly oiled bowl, cover with a damp cloth, and let rise in a warm place for 1 to 1.5 hours, or until doubled in size.
    2. Tip: If your kitchen is cool, place the bowl in a slightly warm (but turned off) oven.

    Step 3: Prepare the Raspberry Filling

    1. In a small bowl, gently toss the raspberries with:
    2. Lemon zest
    3. Lemon juice
    4. Sugar
    5. Ground cinnamon
    6. Set aside and let the mixture macerate while the dough finishes rising.

    Step 4: Roll Out the Dough

    1. Once the dough has doubled, punch it down and turn it onto a floured surface.
    2. Roll it into a rectangle about 12×18 inches.

    Step 5: Add the Filling

    1. Spread the raspberry mixture evenly over the dough.
    2. Gently press the filling into the dough to help it stick.

    Step 6: Roll and Slice

    1. Starting from the long edge, tightly roll the dough into a log.
    2. Slice into 12 equal rolls using a sharp knife or unflavored dental floss for cleaner cuts.

    Step 7: Second Rise

    1. Arrange the rolls in a greased 9×13-inch baking dish.
    2. Cover with a clean towel and let rise again for 30–45 minutes, until puffy.

    Step 8: Bake

    1. Preheat your oven to 350°F (175°C).
    2. Bake the rolls for 25–30 minutes, until golden brown and the filling is bubbly.

    Step 9: Make the Glaze

    1. In a bowl, whisk together:
    2. Powdered sugar
    3. Vanilla extract
    4. Lemon juice (adjust until desired consistency is reached)

    Step 10: Glaze and Serve!

    1. Drizzle the glaze over the warm rolls.
    2. Garnish with extra raspberries and lemon zest if desired.
    3. Serve and enjoy every sweet, tangy bite!

    Variations
    Want to put your own twist on these Raspberry Cinnamon Rolls? Try these ideas:

    1. Add Cream Cheese Glaze
    Swap the lemon glaze for a luscious cream cheese frosting.

    2. Mixed Berry Rolls
    Use a mix of blueberries, strawberries, and raspberries for a berry explosion.

    3. Nutty Raspberry Rolls
    Add 1/2 cup chopped pecans or almonds to the filling for crunch.

    4. Chocolate Raspberry Rolls
    Sprinkle mini chocolate chips over the raspberry filling before rolling up.

    5. Spiced Up
    Increase the cinnamon and add a pinch of cardamom for extra warmth.

    6. Overnight Method
    Prep the rolls the night before, cover tightly, and refrigerate. In the morning, let them come to room temperature and bake as directed.

    Storage and Reheating
    Storage:
    Store cooled rolls in an airtight container at room temperature for 2 days.

    For longer storage, refrigerate for up to 5 days.

    Freezing:
    Freeze unglazed rolls for up to 2 months.

    Thaw overnight in the fridge, then warm and glaze before serving.

    Reheating:
    Microwave individual rolls for 15–20 seconds.

    Reheat in the oven at 300°F (150°C) for 8–10 minutes.

    Pro Tip: Add a splash of milk or water before reheating to keep them soft!

    10 Frequently Asked Questions (FAQs)
    1. Can I use frozen raspberries?
    Yes! Use frozen berries directly from the freezer — no need to thaw.

    2. Can I make these rolls ahead of time?
    Absolutely! Prepare and shape the rolls, cover, and refrigerate overnight. Bake fresh in the morning.

    3. What if I don’t have instant yeast?
    You can use active dry yeast. Just dissolve it in the warm milk with a pinch of sugar first, and let it sit for 5–10 minutes until frothy.

    4. Can I use a stand mixer?
    Yes! Use the dough hook attachment to knead the dough for about 6–8 minutes.

    5. How do I get cleaner slices?
    Use unflavored dental floss to slice the dough cleanly without squishing it.

    6. What flour works best?
    All-purpose flour is perfect, but you can use bread flour for an even chewier texture.

    7. Can I add a crumble topping?
    Yes! Mix butter, sugar, and flour for a quick streusel to sprinkle over the rolls before baking.

    8. How do I prevent soggy bottoms?
    Avoid overfilling and bake on the middle rack. Also, let the rolls cool slightly before serving.

    9. Can I double the recipe?
    Of course! Just use two baking dishes and rotate them halfway through baking.

    10. What’s the best way to serve them?
    Warm, with a hot cup of coffee or tea — and extra glaze for dipping!

    Conclusion
    There’s something magical about homemade rolls — especially when they’re filled with juicy raspberries and warm cinnamon spice. 🍓✨

    These Raspberry Cinnamon Rolls are soft, fluffy, and bursting with bright, fruity flavor. The sweet-tart balance of the raspberries, the cozy warmth of cinnamon, and the finishing touch of tangy lemon glaze make every bite unforgettable.

    They’re perfect for lazy weekend breakfasts, festive brunches, or anytime you want to treat yourself and your loved ones to a bakery-quality experience at home.

    For more cozy bakes, try these Blueberry Sweet Rolls or this Lemon Poppy Seed Bread.

    Happy baking!

  • Bananas Foster Bread Pudding – A Decadent Twist on a Classic Dessert!

    Bananas Foster Bread Pudding – A Decadent Twist on a Classic Dessert!

    Bananas Foster Bread Pudding – A Decadent Twist on a Classic Dessert!

    Get ready to fall in love with dessert all over again! 🍌✨ This Bananas Foster Bread Pudding takes two beloved desserts — the rich, custardy goodness of bread pudding and the caramelized, rum-kissed flavors of Bananas Foster — and combines them into one irresistible masterpiece. Imagine cubes of soft bread soaked in a creamy custard, layered with caramelized bananas, and finished with a glossy, buttery sauce. Yes, it’s every bit as indulgent as it sounds! Whether you’re hosting a holiday dinner, craving a show-stopping dessert, or looking for a cozy weekend treat, this recipe will wow your guests and satisfy every sweet tooth at the table. If you’re a fan of bread pudding, don’t miss this Classic Bread Pudding or, for another twist, this Chocolate Croissant Bread Pudding. Let’s bake up some magic!

    • For the Bread Pudding:
    • 6 cups brioche or challah bread (cut into 1-inch cubes (day-old is best!))
    • 4 ripe bananas (sliced)
    • 4 large eggs
    • 2 cups whole milk
    • 1 cup heavy cream
    • 3/4 cup brown sugar
    • 1/4 cup granulated sugar
    • 2 teaspoons pure vanilla extract
    • 1/2 teaspoon cinnamon
    • 1/4 teaspoon nutmeg
    • 1/4 teaspoon salt
    • For the Bananas Foster Sauce:
    • 4 tablespoons unsalted butter
    • 3/4 cup brown sugar
    • 2 ripe bananas (sliced)
    • 1/4 cup dark rum
    • 1/2 teaspoon cinnamon
    • Pinch of salt
    • Optional Garnishes:
    • Vanilla ice cream or whipped cream
    • Powdered sugar
    • Extra caramel sauce
    • Toasted pecans

    Step 1: Prep the Bread and Pan

    1. Preheat your oven to 350°F (175°C).
    2. Grease a 9×13-inch baking dish with butter or cooking spray.
    3. Spread the bread cubes evenly in the prepared dish.

    Step 2: Make the Custard

    1. In a large mixing bowl, whisk together:
    2. Eggs
    3. Milk
    4. Heavy cream
    5. Brown sugar
    6. Granulated sugar
    7. Vanilla extract
    8. Cinnamon
    9. Nutmeg
    10. Salt
    11. Whisk until smooth and well combined.

    Step 3: Assemble the Pudding

    1. Pour the custard evenly over the bread cubes.
    2. Gently press down the bread so it soaks up the custard.
    3. Nestle the sliced bananas between the bread cubes.
    4. Let it sit for 15 minutes to absorb the custard fully.

    Step 4: Bake

    1. Bake uncovered for 45–50 minutes, or until the pudding is set and golden on top.
    2. Tip: If the top starts to brown too quickly, tent with foil.

    Step 5: Make the Bananas Foster Sauce

    1. In a medium saucepan over medium heat, melt butter.
    2. Add brown sugar, cinnamon, and a pinch of salt. Stir until the sugar dissolves.
    3. Add the banana slices and cook for 2–3 minutes, until softened.
    4. Carefully add rum, and (if desired) ignite carefully with a long lighter to flambé.
    5. Cook until the alcohol burns off and the sauce is glossy.

    Step 6: Serve and Enjoy!

    1. Spoon the warm Bananas Foster sauce over the baked bread pudding.
    2. Serve with a scoop of vanilla ice cream or a dollop of whipped cream.
    3. Enjoy the decadent, comforting flavors of this ultimate dessert!

    Variations
    Make your Bananas Foster Bread Pudding unique with these creative twists!

    1. Chocolate Lover’s Version
    Add 1/2 cup chocolate chips between the bread layers.

    2. Nutty Delight
    Sprinkle toasted pecans or walnuts for crunch.

    3. Boozier Sauce
    Increase the rum to 1/3 cup for extra depth.

    4. Vegan Option
    Use coconut milk and flax eggs in the custard, and vegan butter for the sauce.

    5. Cinnamon Swirl
    Add a cinnamon sugar swirl between the bread layers for extra spice.

    6. Tropical Twist
    Add pineapple chunks or toasted coconut flakes for island flair!

    Storage and Reheating
    Storage:
    Store leftovers covered in the refrigerator for up to 4 days.

    Freezing:
    Freeze in an airtight container for up to 2 months.

    Thaw overnight in the refrigerator before reheating.

    Reheating:
    Reheat individual portions in the microwave for 30–45 seconds.

    For the oven, cover with foil and warm at 350°F for 10–15 minutes.

    Pro Tip: Warm the Bananas Foster sauce separately and drizzle over the reheated pudding for best results!

    10 Frequently Asked Questions (FAQs)
    1. Can I make this bread pudding ahead of time?
    Yes! Assemble the pudding (without baking) the night before, cover, and refrigerate. Bake fresh the next day.

    2. What’s the best bread for bread pudding?
    Brioche and challah are excellent because they’re rich and absorb custard well.

    3. Can I skip the rum?
    Yes — for a no-alcohol version, replace with apple juice or extra butter and vanilla extract.

    4. Can I use frozen bananas?
    Fresh bananas work best, but thawed frozen bananas can work in the sauce.

    5. How do I flambé the sauce safely?
    Use a long lighter and stand back when igniting. Ensure no flammable materials are nearby!

    6. Can I add raisins?
    Absolutely! Soak them in warm rum or water for extra flavor.

    7. Can I make this gluten-free?
    Yes! Use your favorite gluten-free bread.

    8. Is this dessert overly sweet?
    It’s rich but balanced! Serve with whipped cream or ice cream to mellow the sweetness.

    9. Can I halve the recipe?
    Yes — use an 8×8-inch pan and halve all ingredients.

    10. What drinks pair well with this dessert?
    Try dark rum cocktails, coffee, or a dessert wine like Moscato!

    Conclusion
    This Bananas Foster Bread Pudding is the ultimate fusion of two beloved classics. 🍌🍞✨

    With creamy, custardy bread pudding and the irresistible caramel-rum sauce of Bananas Foster, every bite is warm, gooey, and packed with indulgent flavor. Whether you serve it for the holidays, a weekend brunch, or a cozy family dessert, this recipe is guaranteed to become a new favorite.

    Plus, it’s easy to make ahead, freezer-friendly, and endlessly customizable. So go ahead, treat yourself and your loved ones to this crowd-pleasing, comforting dessert!

    For more decadent desserts, check out this Caramel Bread Pudding or this Sticky Toffee Pudding.

    Happy baking, and enjoy every luscious bite!

  • Chicken in Basil Cream Sauce – A Rich, Flavorful, Restaurant-Worthy Dish!

    Chicken in Basil Cream Sauce – A Rich, Flavorful, Restaurant-Worthy Dish!

    Chicken in Basil Cream Sauce – A Rich, Flavorful, Restaurant-Worthy Dish!

    If you’re looking for a dinner that feels elegant yet comes together quickly, you need to try this Chicken in Basil Cream Sauce. 🍃✨ Tender, juicy chicken breasts are lightly pan-seared and smothered in a silky, creamy basil-infused sauce that’s bursting with fresh herb flavor. With garlic undertones and a rich Parmesan finish, this dish tastes like something you’d order at a fine Italian restaurant — but it’s so simple to make at home. Whether you’re cooking for family, impressing guests, or just treating yourself to a delicious meal, this recipe is a guaranteed winner. Serve it over pasta, rice, or with crusty bread to soak up every last drop of that luscious cream sauce. If you love creamy, herby chicken dishes, you’ll also adore this Tuscan Garlic Chicken or this Creamy Pesto Chicken. Let’s dive into this creamy goodness!

    • Chicken:
    • 4 boneless (skinless chicken breasts)
    • Salt and black pepper (to taste)
    • 2 tablespoons olive oil (for sautéing)
    • Sauce:
    • 2 tablespoons butter
    • 3 cloves garlic (minced)
    • 1 cup chicken broth (low sodium)
    • 1 cup heavy cream
    • 1/2 cup grated Parmesan cheese
    • 1/2 teaspoon red pepper flakes (optional, for a little heat)
    • Salt and pepper (to taste)
    • Fresh Herbs:
    • 1 cup fresh basil leaves (chopped or thinly sliced (plus extra for garnish))
    • Optional for Serving:
    • Cooked pasta (like linguine or fettuccine)
    • Steamed rice
    • Crusty bread
    • Extra Parmesan cheese

    Step 1: Season and Cook the Chicken

    1. Pat the chicken breasts dry and season both sides generously with salt and black pepper.
    2. In a large skillet, heat olive oil over medium-high heat.
    3. Add the chicken and cook for 6–7 minutes per side, until golden brown and cooked through (internal temperature should reach 165°F / 74°C).
    4. Remove the chicken from the pan and set aside on a plate.

    Step 2: Make the Flavorful Base

    1. In the same skillet, reduce heat to medium.
    2. Add butter and let it melt.
    3. Stir in the minced garlic and sauté for 1 minute until fragrant but not browned.

    Step 3: Build the Sauce

    1. Pour in the chicken broth, scraping up any browned bits from the bottom of the pan (this adds tons of flavor!).
    2. Let it simmer for 2–3 minutes to reduce slightly.
    3. Add the heavy cream and Parmesan cheese, stirring until smooth and creamy.
    4. Season with salt, pepper, and optional red pepper flakes for a little kick.

    Step 4: Add the Basil

    1. Stir in the fresh basil, reserving a bit for garnish.
    2. Simmer the sauce for another 2–3 minutes, allowing the basil to infuse its flavor.

    Step 5: Finish the Dish

    1. Return the cooked chicken breasts to the skillet.
    2. Spoon the sauce over the chicken and cook for an additional 2 minutes to warm through.

    Step 6: Serve and Enjoy!

    1. Garnish with extra basil and Parmesan cheese.
    2. Serve hot over your favorite pasta, rice, or with crusty bread.

    Variations
    Looking to customize your Chicken in Basil Cream Sauce? Try these ideas!

    1. Add Veggies
    Stir in sun-dried tomatoes, spinach, or asparagus for color and nutrition.

    2. Pasta Swap
    Serve over zucchini noodles or gluten-free pasta for a lighter option.

    3. Lemon Zest Lift
    Add a squeeze of fresh lemon juice or a bit of lemon zest for brightness.

    4. Cheesy Twist
    Mix in mozzarella pearls or extra Parmesan for a cheesier sauce.

    5. Make It Spicy
    Increase the red pepper flakes or add a pinch of cayenne pepper.

    6. Dairy-Free
    Use coconut cream and nutritional yeast instead of cream and cheese for a dairy-free version.

    Storage and Reheating
    Storage:
    Store leftovers in an airtight container in the refrigerator for up to 3 days.

    Freezing:
    Freeze the chicken and sauce separately for up to 2 months.

    Thaw overnight in the fridge before reheating.

    Reheating:
    Reheat gently in a skillet over low heat.

    Add a splash of broth or cream to refresh the sauce.

    Pro Tip: Avoid high heat when reheating to prevent the sauce from separating!

    10 Frequently Asked Questions (FAQs)
    1. Can I use chicken thighs instead of breasts?
    Absolutely! Chicken thighs work beautifully and stay extra juicy.

    2. Can I use dried basil?
    Fresh basil is best, but if needed, use 1 tablespoon dried basil.

    3. Is this dish spicy?
    It’s mild, but you can increase the red pepper flakes for more heat.

    4. What can I use instead of heavy cream?
    Try half-and-half, but the sauce will be slightly less rich.

    5. Can I make this ahead of time?
    Yes! Store the sauce and chicken separately for the best texture.

    6. Can I make it vegetarian?
    Yes! Swap chicken for tofu or mushrooms and use vegetable broth.

    7. Can I use pre-cooked chicken?
    You can, but freshly seared chicken adds the most flavor.

    8. How do I thicken the sauce?
    Simmer a bit longer, or add 1 teaspoon cornstarch mixed with water.

    9. What wine pairs well with this dish?
    A Chardonnay or Pinot Grigio complements the creamy sauce.

    10. Is this freezer-friendly?
    Yes, but freeze the chicken and sauce separately for best results!

    Conclusion
    There’s nothing quite as comforting as a skillet full of Chicken in Basil Cream Sauce. 🍗🍃✨

    With its rich, creamy texture, fresh herbal notes, and juicy pan-seared chicken, this dish is guaranteed to impress. Plus, it’s ready in just 30 minutes — making it the perfect solution for busy weeknights or relaxed weekend dinners.

    Whether you enjoy it over pasta, with crusty bread, or paired with your favorite vegetables, this recipe delivers flavor and elegance in every bite.

    For even more creamy chicken inspiration, try this Chicken Alfredo Bake or this crowd-pleasing Creamy Tuscan Chicken.

    Happy cooking!

  • Baked Crunchy Hot Honey Chicken – Sweet, Spicy, and Irresistibly Crispy!

    Baked Crunchy Hot Honey Chicken – Sweet, Spicy, and Irresistibly Crispy!

    Baked Crunchy Hot Honey Chicken – Sweet, Spicy, and Irresistibly Crispy!

    If you’re craving something crispy, spicy, and just a little bit sweet, this Baked Crunchy Hot Honey Chicken is your new go-to recipe! 🍯🔥🍗 Imagine perfectly tender chicken coated in a crunchy cornflake crust, baked (not fried!) to golden perfection, and finished with a drizzle of fiery hot honey glaze. It’s everything you want in a comfort food dish — crunchy, sweet, spicy, and satisfying. This recipe is oven-baked, making it a healthier alternative to traditional fried chicken, but you won’t miss a thing when it comes to flavor or texture. Whether you’re making dinner for the family, meal-prepping for the week, or hosting game night, this chicken always delivers. If you love spicy-sweet recipes, you’ll also enjoy this Hot Honey Chicken Wings or these crispy Baked Chicken Tenders. Let’s get into it!

    • Meat:
    • 2 lbs chicken breast tenderloins
    • Refrigerated:
    • 2 large eggs
    • Breakfast Foods:
    • 6 cups cornflakes (crushed (for ultra-crunchy coating))
    • Dairy:
    • 1/4 cup Parmesan cheese (grated)
    • Produce & Herbs:
    • 3/4 teaspoon chipotle chili powder
    • 1 teaspoon onion powder
    • 1 teaspoon garlic powder
    • 1 fresh thyme sprig (leaves removed)
    • Condiments:
    • 1/2 cup honey
    • 4 tablespoons hot sauce
    • Baking & Spices:
    • 1 teaspoon cayenne pepper
    • 1 teaspoon smoked paprika
    • Sea salt (to taste)
    • Oils & Vinegars:
    • 1 tablespoon extra virgin olive oil (for drizzling)
    • Optional Garnishes:
    • Fresh thyme
    • Extra drizzle of hot honey
    • Lemon wedges for serving

    Step 1: Preheat and Prep

    1. Preheat your oven to 425°F (220°C).
    2. Line a baking sheet with parchment paper or lightly grease with olive oil spray.

    Step 2: Prepare the Crunchy Coating

    1. Place the cornflakes in a large zip-top bag and crush with a rolling pin or pulse in a food processor until coarsely crushed (not fine crumbs!).
    2. Transfer to a shallow bowl and mix in:
    3. Parmesan cheese
    4. Chipotle chili powder
    5. Paprika
    6. Cayenne pepper
    7. Garlic powder
    8. Onion powder
    9. Thyme leaves
    10. Sea salt, to taste

    Step 3: Set Up the Dredging Station

    1. In one shallow bowl, whisk the eggs.
    2. In another shallow bowl, place your seasoned cornflake mixture.

    Step 4: Coat the Chicken

    1. Dip each chicken tenderloin into the egg, letting the excess drip off.
    2. Press into the cornflake mixture, ensuring each piece is fully coated.
    3. Place the coated chicken on the prepared baking sheet.
    4. Lightly drizzle or spray with olive oil for extra crispiness.

    Step 5: Bake

    1. Bake for 18–22 minutes, flipping once halfway through, until the coating is golden and crispy, and the chicken is cooked through (internal temperature should reach 165°F / 74°C).

    Step 6: Make the Hot Honey Glaze

    1. While the chicken bakes, in a small saucepan over low heat, combine:
    2. Honey
    3. Hot sauce
    4. Stir and warm until combined and slightly runny.

    Step 7: Finish and Serve

    1. Drizzle the warm hot honey glaze over the baked chicken just before serving.
    2. Garnish with fresh thyme and optional lemon wedges.
    3. Serve immediately and enjoy the perfect balance of spicy, sweet, and crunchy!

    Variations
    Want to customize your Baked Crunchy Hot Honey Chicken? Try these tasty twists:

    1. Maple Heat
    Swap honey for maple syrup for a deep, caramelized sweetness.

    2. No Heat Version
    Skip the hot sauce and cayenne for a kid-friendly, sweet-only option.

    3. Air Fryer Method
    Cook at 400°F (200°C) in the air fryer for 12–14 minutes, flipping halfway through.

    4. Spicy Ranch Dip
    Serve with a side of ranch dressing mixed with extra hot sauce for dipping.

    5. Extra Crispy
    Double-coat the chicken: dip in egg and cornflake mixture twice before baking.

    6. Gluten-Free
    Use gluten-free cornflakes to make this recipe gluten-free!

    Storage and Reheating
    Storage:
    Store leftovers in an airtight container in the refrigerator for up to 3 days.

    Freezing:
    Freeze cooked chicken tenders for up to 2 months.

    Reheat from frozen in the oven at 375°F (190°C) for 15–18 minutes.

    Reheating:
    Reheat in the oven at 375°F (190°C) for 8–10 minutes.

    For extra crispiness, use an air fryer at 375°F for 5–6 minutes.

    Pro Tip: Drizzle with fresh hot honey before serving for the best flavor!

    10 Frequently Asked Questions (FAQs)
    1. Can I use chicken thighs instead of tenderloins?
    Absolutely! Just adjust cooking time by a few minutes longer for larger pieces.

    2. Can I make this less spicy?
    Yes! Reduce or omit the cayenne pepper and use a milder hot sauce.

    3. What’s the best substitute for cornflakes?
    Panko breadcrumbs work well, but cornflakes give unbeatable crunch.

    4. Can I prep this ahead of time?
    Yes — coat the chicken and refrigerate for up to 8 hours before baking.

    5. Can I make this dairy-free?
    Skip the Parmesan or use a dairy-free cheese alternative.

    6. What hot sauce works best?
    Use your favorite! Frank’s RedHot, Cholula, or Tabasco are great options.

    7. Can I make this sweeter?
    Add an extra tablespoon of honey to the glaze for more sweetness.

    8. How do I know the chicken is fully cooked?
    Use a thermometer — chicken is done at 165°F (74°C) internally.

    9. Can I bake this on a wire rack?
    Yes! It helps air circulate for an even crispier result.

    10. Is this recipe kid-friendly?
    Yes — just reduce or omit the spice for a milder version!

    Conclusion
    This Baked Crunchy Hot Honey Chicken hits all the right notes — sweet, spicy, crunchy, and irresistibly good! 🍗🍯🔥

    The cornflake coating brings the crunch, while the hot honey drizzle balances heat and sweetness in every single bite. And because it’s baked, not fried, you get all the flavor with less oil and hassle.

    Perfect for quick weeknight dinners, fun weekend gatherings, or make-ahead lunches, this recipe is bound to become a family favorite.

    For more spicy-sweet recipes, check out these Spicy Honey Garlic Chicken Thighs or this Hot Honey Salmon.

    Now grab your honey, crank up the heat, and bake this crispy masterpiece! 🎉

  • Best Fluffy Pancakes – Light, Airy, and Absolutely Irresistible!

    Best Fluffy Pancakes – Light, Airy, and Absolutely Irresistible!

    Best Fluffy Pancakes – Light, Airy, and Absolutely Irresistible!

    There’s just something magical about a stack of golden, fluffy pancakes on a lazy morning. 🥞✨ These Best Fluffy Pancakes are exactly what your breakfast dreams are made of — light as air, soft on the inside, and slightly crisp on the edges. With just the right balance of sweetness, a hint of vanilla, and optional bursts of juicy blueberries, they’re perfect for weekends, brunch parties, or anytime you crave a comforting start to your day. What makes these pancakes stand out? It’s all about the ingredients and the technique. The combination of baking powder for lift, warm cinnamon for depth, and melted butter for richness gives you that diner-style pancake at home. Want to take it to the next level? Try them with a drizzle of maple syrup, a dollop of whipped cream, or a dusting of powdered sugar. For even more pancake inspiration, check out this Buttermilk Pancake Recipe or these fluffy Japanese Soufflé Pancakes. Let’s flip some pancakes!

    • Produce:
    • 1/2 cup blueberries (optional, fresh or frozen — for a fruity burst!)
    • Refrigerated:
    • 1 large egg
    • Dairy:
    • 3 tablespoons unsalted butter (melted)
    • 1 1/4 cups milk (whole milk for richness)
    • Baking & Spices:
    • 1 1/2 cups all-purpose flour
    • 3 1/2 teaspoons baking powder
    • 1/2 teaspoon cinnamon
    • 1/2 teaspoon salt
    • 1 tablespoon sugar
    • 1 teaspoon vanilla extract
    • Optional Toppings:
    • Maple syrup
    • Butter
    • Whipped cream
    • Extra blueberries
    • Powdered sugar

    Step 1: Melt the Butter

    1. In a small saucepan or microwave, melt the butter and set aside to cool slightly.

    Step 2: Combine Dry Ingredients

    1. In a large mixing bowl, whisk together:
    2. Flour
    3. Baking powder
    4. Cinnamon
    5. Salt
    6. Sugar
    7. Tip: Sifting the flour and baking powder can make your pancakes even lighter!

    Step 3: Mix Wet Ingredients

    1. In a separate bowl, whisk together:
    2. Milk
    3. Egg
    4. Vanilla extract
    5. Melted butter (cooled)

    Step 4: Make the Batter

    1. Pour the wet ingredients into the dry ingredients.
    2. Gently fold until just combined — do not overmix!
    3. The batter should be slightly lumpy. Overmixing leads to flat pancakes.

    Step 5: Add Blueberries (Optional)

    1. If using blueberries, gently fold them into the batter.

    Step 6: Heat the Pan

    1. Heat a non-stick skillet or griddle over medium heat.
    2. Lightly grease with a bit of butter or cooking spray.

    Step 7: Cook the Pancakes

    1. Scoop about 1/4 cup of batter onto the skillet for each pancake.
    2. Cook until bubbles form on the surface and the edges look set, about 2–3 minutes.
    3. Flip and cook for another 1–2 minutes, until golden brown.

    Step 8: Serve and Enjoy!

    1. Stack pancakes high, top with butter, syrup, and extra blueberries.
    2. Serve warm and enjoy the fluffiest pancakes ever!

    Variations
    Want to make these fluffy pancakes your own? Try these fun variations:

    1. Chocolate Chip Pancakes
    Fold 1/2 cup mini chocolate chips into the batter.

    2. Lemon Blueberry Pancakes
    Add 1 tablespoon lemon zest for a zesty twist.

    3. Banana Pancakes
    Mash 1 ripe banana and mix into the wet ingredients.

    4. Nutty Delight
    Add 1/4 cup chopped pecans or walnuts for a bit of crunch.

    5. Gluten-Free
    Substitute with a 1:1 gluten-free flour blend for a gluten-free version.

    6. Vegan Pancakes
    Use plant-based milk, flax egg (1 tbsp flaxseed + 3 tbsp water), and vegan butter.

    Storage and Reheating
    Storage:
    Store leftover pancakes in an airtight container in the fridge for up to 3 days.

    Freezing:
    Freeze pancakes between sheets of parchment paper in a freezer bag for up to 2 months.

    Reheating:
    Reheat in the toaster or oven at 300°F (150°C) for about 5 minutes.

    You can microwave for 20–30 seconds, but toasters give a crispier edge!

    Pro Tip: Make a double batch and freeze extras for busy mornings!

    10 Frequently Asked Questions (FAQs)
    1. Can I use buttermilk instead of regular milk?
    Yes! Buttermilk adds a tangy flavor and extra tenderness.

    2. Why are my pancakes flat?
    Overmixing or expired baking powder can result in flat pancakes. Mix gently!

    3. Can I make the batter ahead of time?
    It’s best to cook the batter fresh, but you can mix dry and wet ingredients separately and combine just before cooking.

    4. Can I add protein powder?
    Yes! Add 1–2 scoops of your favorite protein powder, but you may need to add a splash of extra milk.

    5. What’s the best pan to use?
    A non-stick griddle or cast-iron skillet works best for even browning.

    6. How do I know when to flip?
    Flip when bubbles form on the surface and the edges look set.

    7. Can I make these pancakes smaller?
    Yes! Use 1–2 tablespoons of batter for mini pancakes — perfect for kids.

    8. Can I make them without blueberries?
    Of course! They’re delicious plain or with other mix-ins.

    9. How do I keep pancakes warm while cooking batches?
    Place them on a baking sheet in the oven at 200°F (93°C).

    10. Can I make these pancakes sugar-free?
    Yes — simply omit the sugar or use a natural sweetener like monk fruit or stevia.

    Conclusion
    There’s nothing like a warm stack of Best Fluffy Pancakes to start your day right. 🥞✨

    These pancakes are wonderfully light, slightly sweet, and oh-so-comforting. Whether you enjoy them with classic maple syrup, fresh blueberries, or even a dollop of whipped cream, they’re sure to become a family favorite.

    They’re quick to make, freezer-friendly, and customizable to your heart’s desire. So next time you’re craving a cozy breakfast, skip the boxed mix and whip up a batch of these fluffy delights!

    For more breakfast inspiration, try these Banana Pancakes or these fun Pancake Muffins.

    Happy flipping!

  • Fluffy Cottage Cheese Cloud Bread – Light, Airy, and Naturally Protein-Packed!

    Fluffy Cottage Cheese Cloud Bread – Light, Airy, and Naturally Protein-Packed!

    Fluffy Cottage Cheese Cloud Bread – Light, Airy, and Naturally Protein-Packed!

    Have you ever wished bread could be so light, so fluffy, it feels like you’re biting into a cloud? ☁️ Well, let me introduce you to Fluffy Cottage Cheese Cloud Bread — a soft, high-protein, and slightly sweet bread alternative that’s as delightful to eat as it is to make! Using simple, wholesome ingredients like cottage cheese, eggs, and a touch of honey for subtle sweetness, this cloud bread is naturally gluten-free and low in carbs. It’s perfect for those following keto, low-carb, or high-protein diets, but honestly? It’s so tasty, it’s for everyone. Whether you enjoy it for breakfast with fruit and yogurt, as a sandwich base, or as a snack straight from the oven, this cloud bread is about to become your new favorite recipe. If you enjoy light and airy recipes, check out this popular Classic Cloud Bread Recipe or try this creative twist on Low-Carb Cheese Bread. Ready? Let’s bake some clouds!

    • Refrigerated:
    • 3 large eggs (separated)
    • Dairy:
    • 1/2 cup cottage cheese (whole milk for creaminess)
    • Condiments:
    • 1 teaspoon honey (for a hint of natural sweetness)
    • Baking & Spices:
    • 1 tablespoon cornstarch (or arrowroot powder for a grain-free option)
    • 1/4 teaspoon cream of tartar (helps stabilize egg whites)
    • 1/2 teaspoon salt
    • Optional Toppings:
    • Sesame seeds
    • Everything bagel seasoning
    • Chia seeds
    • Cinnamon sugar (for a sweet twist)

    Step 1: Preheat Your Oven

    1. Preheat your oven to 300°F (150°C).
    2. Line a baking sheet with parchment paper or a silicone baking mat for easy cleanup.

    Step 2: Separate the Eggs

    1. Carefully separate the egg whites from the yolks.
    2. Place the whites in a large, clean mixing bowl and the yolks in a separate bowl.
    3. Pro Tip: Make sure no yolk gets into the whites to achieve perfect stiff peaks!

    Step 3: Prepare the Cottage Cheese Mixture

    1. In the bowl with the egg yolks, add:
    2. Cottage cheese
    3. Honey
    4. Cornstarch or arrowroot powder
    5. Salt
    6. Blend until smooth using a hand mixer or immersion blender for a creamy base.

    Step 4: Whip the Egg Whites

    1. Add cream of tartar to the egg whites.
    2. Beat on high speed until stiff peaks form — this will take about 3–4 minutes.

    Step 5: Fold It All Together

    1. Gently fold one-third of the whipped egg whites into the cottage cheese mixture to lighten it.
    2. Carefully fold in the remaining egg whites until fully combined. Be gentle! You want to keep the batter light and airy.

    Step 6: Shape the Cloud Bread

    1. Spoon dollops of batter onto the prepared baking sheet, forming about 6 cloud-like rounds.
    2. Use the back of the spoon to smooth the tops slightly.
    3. Optional: Sprinkle with sesame seeds or everything bagel seasoning for extra flavor.

    Step 7: Bake

    1. Bake for 25–30 minutes, or until the cloud breads are golden brown and slightly firm to the touch.

    Step 8: Cool and Enjoy!

    1. Let cool for 10 minutes on the baking sheet.
    2. Serve warm or at room temperature. Enjoy with spreads, fruit, or just as they are!

    Variations
    Want to customize your Fluffy Cottage Cheese Cloud Bread? Try these fun twists:

    1. Savory Herb Cloud Bread
    Add 1/2 teaspoon garlic powder and 1/2 teaspoon dried herbs like rosemary or thyme.

    2. Cheesy Cloud Bread
    Fold in 1/4 cup grated Parmesan cheese for extra flavor.

    3. Sweet Cloud Bread
    Add 1 teaspoon vanilla extract and a sprinkle of cinnamon sugar for a sweet treat.

    4. Seeded Cloud Bread
    Sprinkle with poppy seeds, chia seeds, or flaxseeds before baking.

    5. Spicy Kick
    Add a pinch of cayenne pepper or a sprinkle of crushed red pepper flakes.

    6. Lemon Zest
    Add 1/2 teaspoon lemon zest to brighten up the flavor!

    Storage and Reheating
    Storage:
    Store cloud bread in an airtight container in the refrigerator for up to 3 days.

    Freezing:
    Freeze cloud bread between layers of parchment paper for up to 1 month.

    Thaw at room temperature or warm in the oven.

    Reheating:
    Reheat in a toaster oven at 300°F (150°C) for 3–5 minutes to restore fluffiness.

    Pro Tip: Avoid microwaving as it can make cloud bread rubbery!

    10 Frequently Asked Questions (FAQs)
    1. Can I use low-fat cottage cheese?
    Yes, but whole milk cottage cheese adds the creamiest texture!

    2. Can I skip the cream of tartar?
    It helps stabilize the egg whites, but you can substitute with 1/2 teaspoon lemon juice.

    3. Can I make this dairy-free?
    Try dairy-free cottage cheese alternatives, but note the texture may vary.

    4. Can I use almond flour instead of cornstarch?
    Almond flour won’t provide the same structure. Stick with cornstarch or arrowroot powder.

    5. Is cloud bread keto-friendly?
    Yes! Especially if you skip the honey or use a sugar-free alternative.

    6. Can I double the recipe?
    Absolutely — double everything for a larger batch.

    7. Why did my cloud bread deflate?
    Overmixing or under-whipping the egg whites can cause deflation.

    8. What spreads go well with cloud bread?
    Try avocado, cream cheese, peanut butter, or even honey butter!

    9. Is this bread good for sandwiches?
    Yes! Use two cloud breads as a sandwich bun for a light, low-carb option.

    10. Can I make this sweet and savory?
    Yes — balance with a little honey and herbs for sweet-savory flavor.

    Conclusion
    There you have it — the perfect, fluffy, and protein-packed Cottage Cheese Cloud Bread! ☁️🍞✨

    This recipe is not only fun to make, but it’s also endlessly versatile. Whether you enjoy it sweet with fruit and honey, or savory with herbs and cheese, cloud bread is a game-changing addition to your kitchen repertoire.

    It’s light, low in carbs, and packed with protein, making it a fantastic option for anyone looking for a healthier bread alternative. Plus, it’s gluten-free and customizable — win-win!

    For more high-protein and gluten-free baking ideas, be sure to check out this Chickpea Flour Flatbread or this Protein Banana Bread.

    Happy baking! Enjoy your fluffy clouds of goodness!

  • English Muffin Breakfast Pizza – The Perfect Savory Morning Treat!

    English Muffin Breakfast Pizza – The Perfect Savory Morning Treat!

    English Muffin Breakfast Pizza – The Perfect Savory Morning Treat!

    Breakfast just got a major upgrade! 🧇🍳✨ Say hello to your new morning favorite: English Muffin Breakfast Pizza. This easy, satisfying recipe brings together all the best breakfast flavors — crispy English muffins, savory breakfast sausage, fluffy scrambled eggs, and loads of melty cheddar cheese. What makes this dish a winner is its versatility. Whether you’re hosting brunch, meal-prepping for busy weekdays, or just craving a hearty, comforting breakfast, these mini breakfast pizzas check every box. They’re quick to assemble, easy to customize, and fun to eat — perfect for kids and adults alike! And if you love creative breakfast ideas, be sure to try these Homemade Breakfast Burritos or this irresistible Avocado Toast with Egg. Let’s get cooking!

    • Meat:
    • 1 lb breakfast sausage (crumbled)
    • 1/4 cup sausage drippings (reserved from cooking sausage)
    • Refrigerated:
    • 8 large eggs
    • 2 cups milk
    • Dairy:
    • 8 oz mild cheddar cheese (shredded)
    • Baking & Spices:
    • 1/4 cup all-purpose flour
    • 1/2 teaspoon salt
    • 1/4 teaspoon black pepper
    • Bread:
    • 1 package English muffins (about 6 muffins, split in half for 12 pieces)
    • Optional toppings:
    • Fresh parsley (chopped)
    • Hot sauce
    • Green onions (sliced)
    • Crushed red pepper flakes

    Step 1: Cook the Sausage

    1. In a large skillet over medium heat, cook the breakfast sausage until browned and fully cooked, breaking it up as it cooks.
    2. Drain the sausage, reserving 1/4 cup of the drippings for the sauce.
    3. Set the cooked sausage aside.

    Step 2: Make the Sausage Gravy Sauce

    1. In the same skillet, heat the reserved sausage drippings over medium heat.
    2. Whisk in the flour, and cook for 1–2 minutes until lightly golden.
    3. Gradually whisk in the milk, stirring constantly to avoid lumps.
    4. Season with salt and pepper.
    5. Cook until the sauce thickens, about 3–5 minutes.
    6. Remove from heat and set aside.

    Step 3: Scramble the Eggs

    1. In a separate pan, scramble the eggs over low heat until just set.
    2. Season lightly with salt and pepper.
    3. Tip: Keep them soft — they’ll finish cooking in the oven!

    Step 4: Prep the English Muffins

    1. Preheat your oven to 375°F (190°C).
    2. Split the English muffins and lay them cut-side up on a baking sheet.
    3. Lightly toast them in the oven for 3–4 minutes to help prevent sogginess.

    Step 5: Assemble the Breakfast Pizzas

    1. Spread a generous spoonful of sausage gravy over each muffin half.
    2. Top with scrambled eggs, a sprinkle of cooked sausage, and a handful of shredded cheddar cheese.

    Step 6: Bake

    1. Bake in the preheated oven for 8–10 minutes, or until the cheese is melted and bubbly.

    Step 7: Garnish and Serve

    1. Remove from the oven and garnish with your favorite toppings like fresh parsley, green onions, or a drizzle of hot sauce.
    2. Serve warm and enjoy your hearty, cheesy breakfast pizzas!

    Variations
    Want to give your English Muffin Breakfast Pizza a fun twist? Try these delicious variations:

    1. Veggie Delight
    Add sautéed spinach, bell peppers, or mushrooms.

    2. Spicy Southwest
    Sprinkle with jalapeños, pepper jack cheese, and a dollop of salsa.

    3. Bacon Lover’s Version
    Swap the sausage for crispy bacon crumbles.

    4. Avocado Breakfast Pizza
    Top with fresh avocado slices after baking for creaminess.

    5. Low-Carb Version
    Use portobello mushroom caps instead of English muffins.

    6. Italian Twist
    Add Italian sausage, mozzarella, and a sprinkle of oregano.

    Storage and Reheating
    Storage:
    Store leftover breakfast pizzas in an airtight container in the refrigerator for up to 3 days.

    Freezing:
    Freeze assembled but unbaked pizzas for up to 2 months.

    Bake from frozen at 375°F for 15–18 minutes.

    Reheating:
    Reheat in the oven at 350°F for 5–7 minutes until warmed through.

    Avoid microwaving, as it can make the muffins soggy.

    Pro Tip: Reheat in an air fryer for extra crispiness!

    10 Frequently Asked Questions (FAQs)
    1. Can I make these breakfast pizzas ahead of time?
    Yes! Assemble them in advance, refrigerate, and bake when ready to serve.

    2. Can I use store-bought gravy?
    You can, but homemade sausage gravy adds much more flavor!

    3. What type of cheese works best?
    Mild cheddar melts beautifully, but feel free to use sharp cheddar, mozzarella, or a blend.

    4. Can I make these vegetarian?
    Definitely! Skip the sausage and load up with your favorite veggies.

    5. Can I freeze baked breakfast pizzas?
    Yes — wrap tightly and freeze for up to 2 months. Reheat in the oven for best results.

    6. What’s the best way to prevent soggy muffins?
    Pre-toast the English muffins before assembling to keep them crisp!

    7. Can I use bagels instead of English muffins?
    Absolutely! Bagels make a thicker, chewier base.

    8. Do I need to use breakfast sausage?
    No, you can use turkey sausage, chorizo, or even vegan sausage!

    9. Can I make these gluten-free?
    Yes! Use gluten-free English muffins and ensure your sausage and flour are gluten-free.

    10. Are these kid-friendly?
    Absolutely! Kids love the fun, mini pizza style — let them help assemble!

    Conclusion
    These English Muffin Breakfast Pizzas are everything you love about breakfast — all in one, easy-to-make package! 🍳🧀✨

    With crispy English muffins, savory sausage, creamy gravy, fluffy eggs, and melty cheddar, every bite is packed with flavor and comfort. Whether you’re hosting a brunch, looking for a fun family breakfast, or prepping meals for the week, this recipe is sure to become a go-to.

    Feel free to customize with your favorite toppings, and don’t be surprised if you find yourself making a double batch!

    For more breakfast inspiration, check out this Breakfast Casserole Recipe or these Savory Breakfast Muffins.

    Happy cooking, and enjoy every bite!